By: Team Modulo Since: Feb 2020 Licence: MIT
- 1. Setting up
- 2. Design
- 3. Implementation
- 4. Documentation
- 5. Testing
- 6. Dev Ops
- Appendix A: Product Scope
- Appendix B: User Stories
- Appendix C: Use Cases
- Appendix D: Non-Functional Requirements
- Appendix E: Glossary
- Appendix F: Product Survey
- Appendix G: Instructions for Manual Testing
- G.1. Launch and Shutdown
- G.2. Adding a module
- G.3. Adding an event
- G.4. Adding a deadline
- G.5. Completing a deadline
- G.6. Switching lists
- G.7. View event or module
- G.8. Find event or module
- G.9. Deleting a module
- G.10. Deleting an event
- G.11. Deleting a deadline
- G.12. Exporting data as
.icsfile - G.13. Viewing help
- G.14. Clearing Modulo
- G.15. Saving data
- Appendix H: Effort
1. Setting up
Refer to the guide here.
2. Design
2.1. Architecture
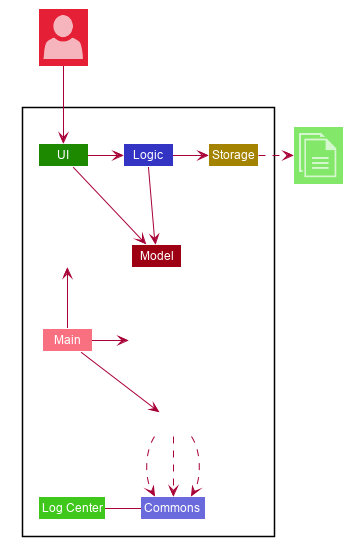
The Architecture Diagram given above explains the high-level design of the App. Given below is a quick overview of each component.
The .puml files used to create diagrams in this document can be found in the diagrams folder.
Refer to the Using PlantUML guide to learn how to create and edit diagrams.
|
-
At app launch: Initializes the components in the correct sequence, and connects them up with each other.
-
At shut down: Shuts down the components and invokes cleanup method where necessary.
Commons represents a collection of classes used by multiple other components.
The following class plays an important role at the architecture level:
-
LogsCenter: Used by many classes to write log messages to the App’s log file.
The rest of the App consists of four components.
Each of the four components
-
Defines its API in an
interfacewith the same name as the Component. -
Exposes its functionality using a
{Component Name}Managerclass.
For example, the Logic component (see the class diagram given below) defines it’s API in the Logic.java interface and exposes its functionality using the LogicManager.java class.
How the architecture components interact with each other
The Sequence Diagram below shows how the components interact with each other for the scenario where the user issues the command delete 1.
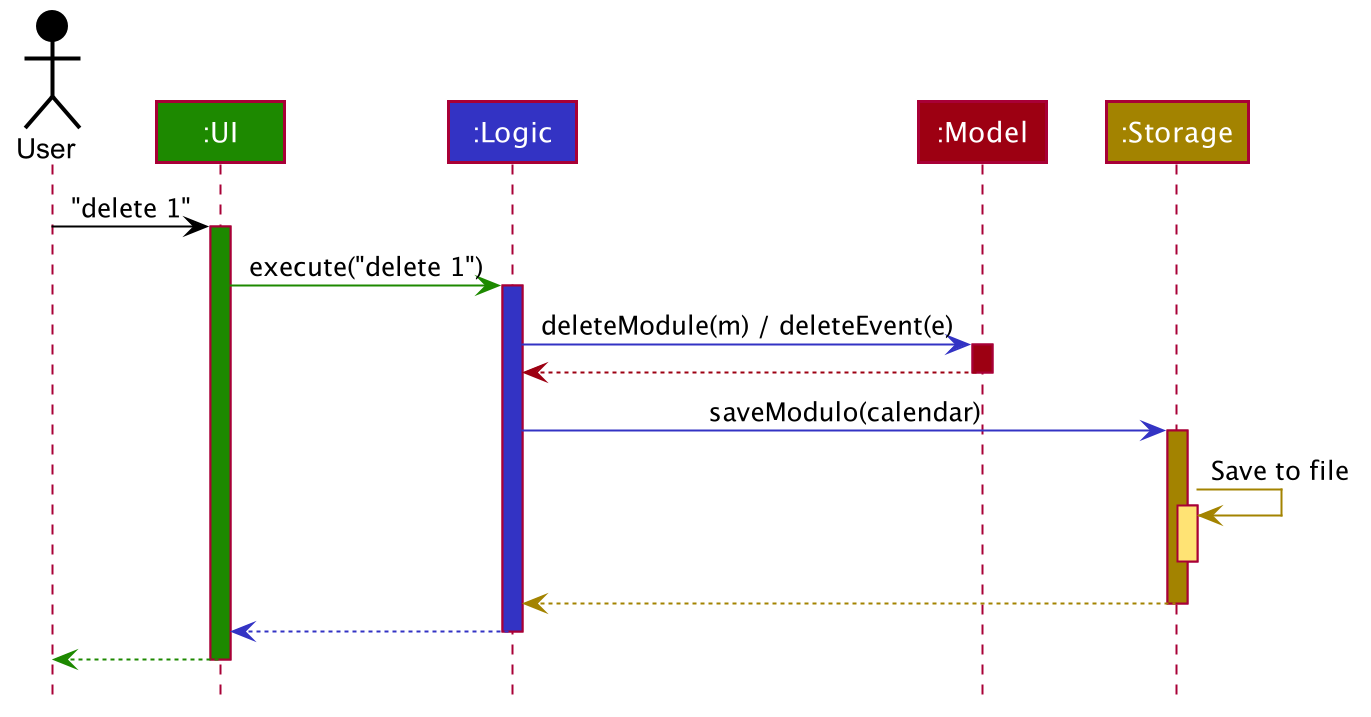
delete 1 commandThe sections below give more details of each component.
2.2. UI component
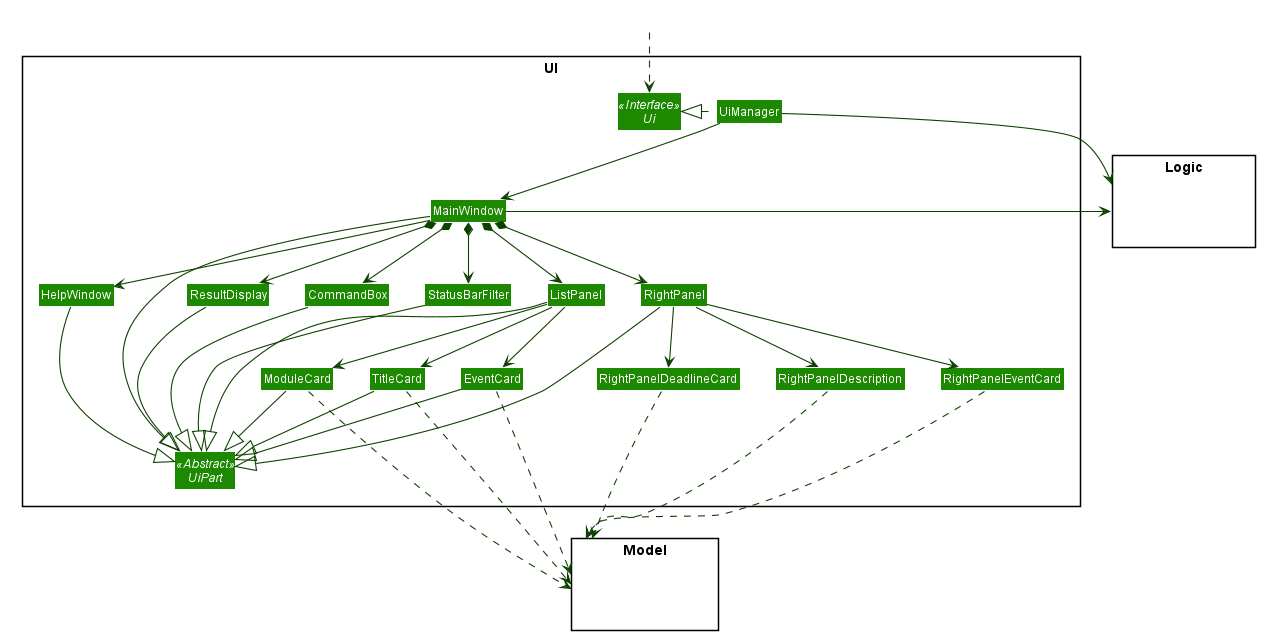
API : Ui.java
The UI consists of a MainWindow that is made up of parts e.g.CommandBox, ResultDisplay, ListPanel, StatusBarFilter, RightPanel etc.
All these, including the MainWindow, inherit from the abstract UiPart class.
The ListPanel is located at the left of the application and it consists of UI EventCard, ModuleCard, TitleCard to display list of events or modules.
The RightPanel is located at the right of the application and it consists of UI RightPanelDeadlineCard ,
RightPanelDescription, and RightPanelEventCard to display the details of the module or event.
For example, user can do view command to view the deadlines of the event in the ListPanel and the details and deadlines of the event will be displayed on the RightPanel.
The UI component uses the JavaFX UI framework.
The layout of these UI parts are defined in matching .fxml files that are in the src/main/resources/view folder.
For example, the layout of the MainWindow is specified in
MainWindow.fxml
The UI component,
-
Executes user commands using the
Logiccomponent. -
Listens for changes to
Modeldata so that the UI can be updated with the modified data.
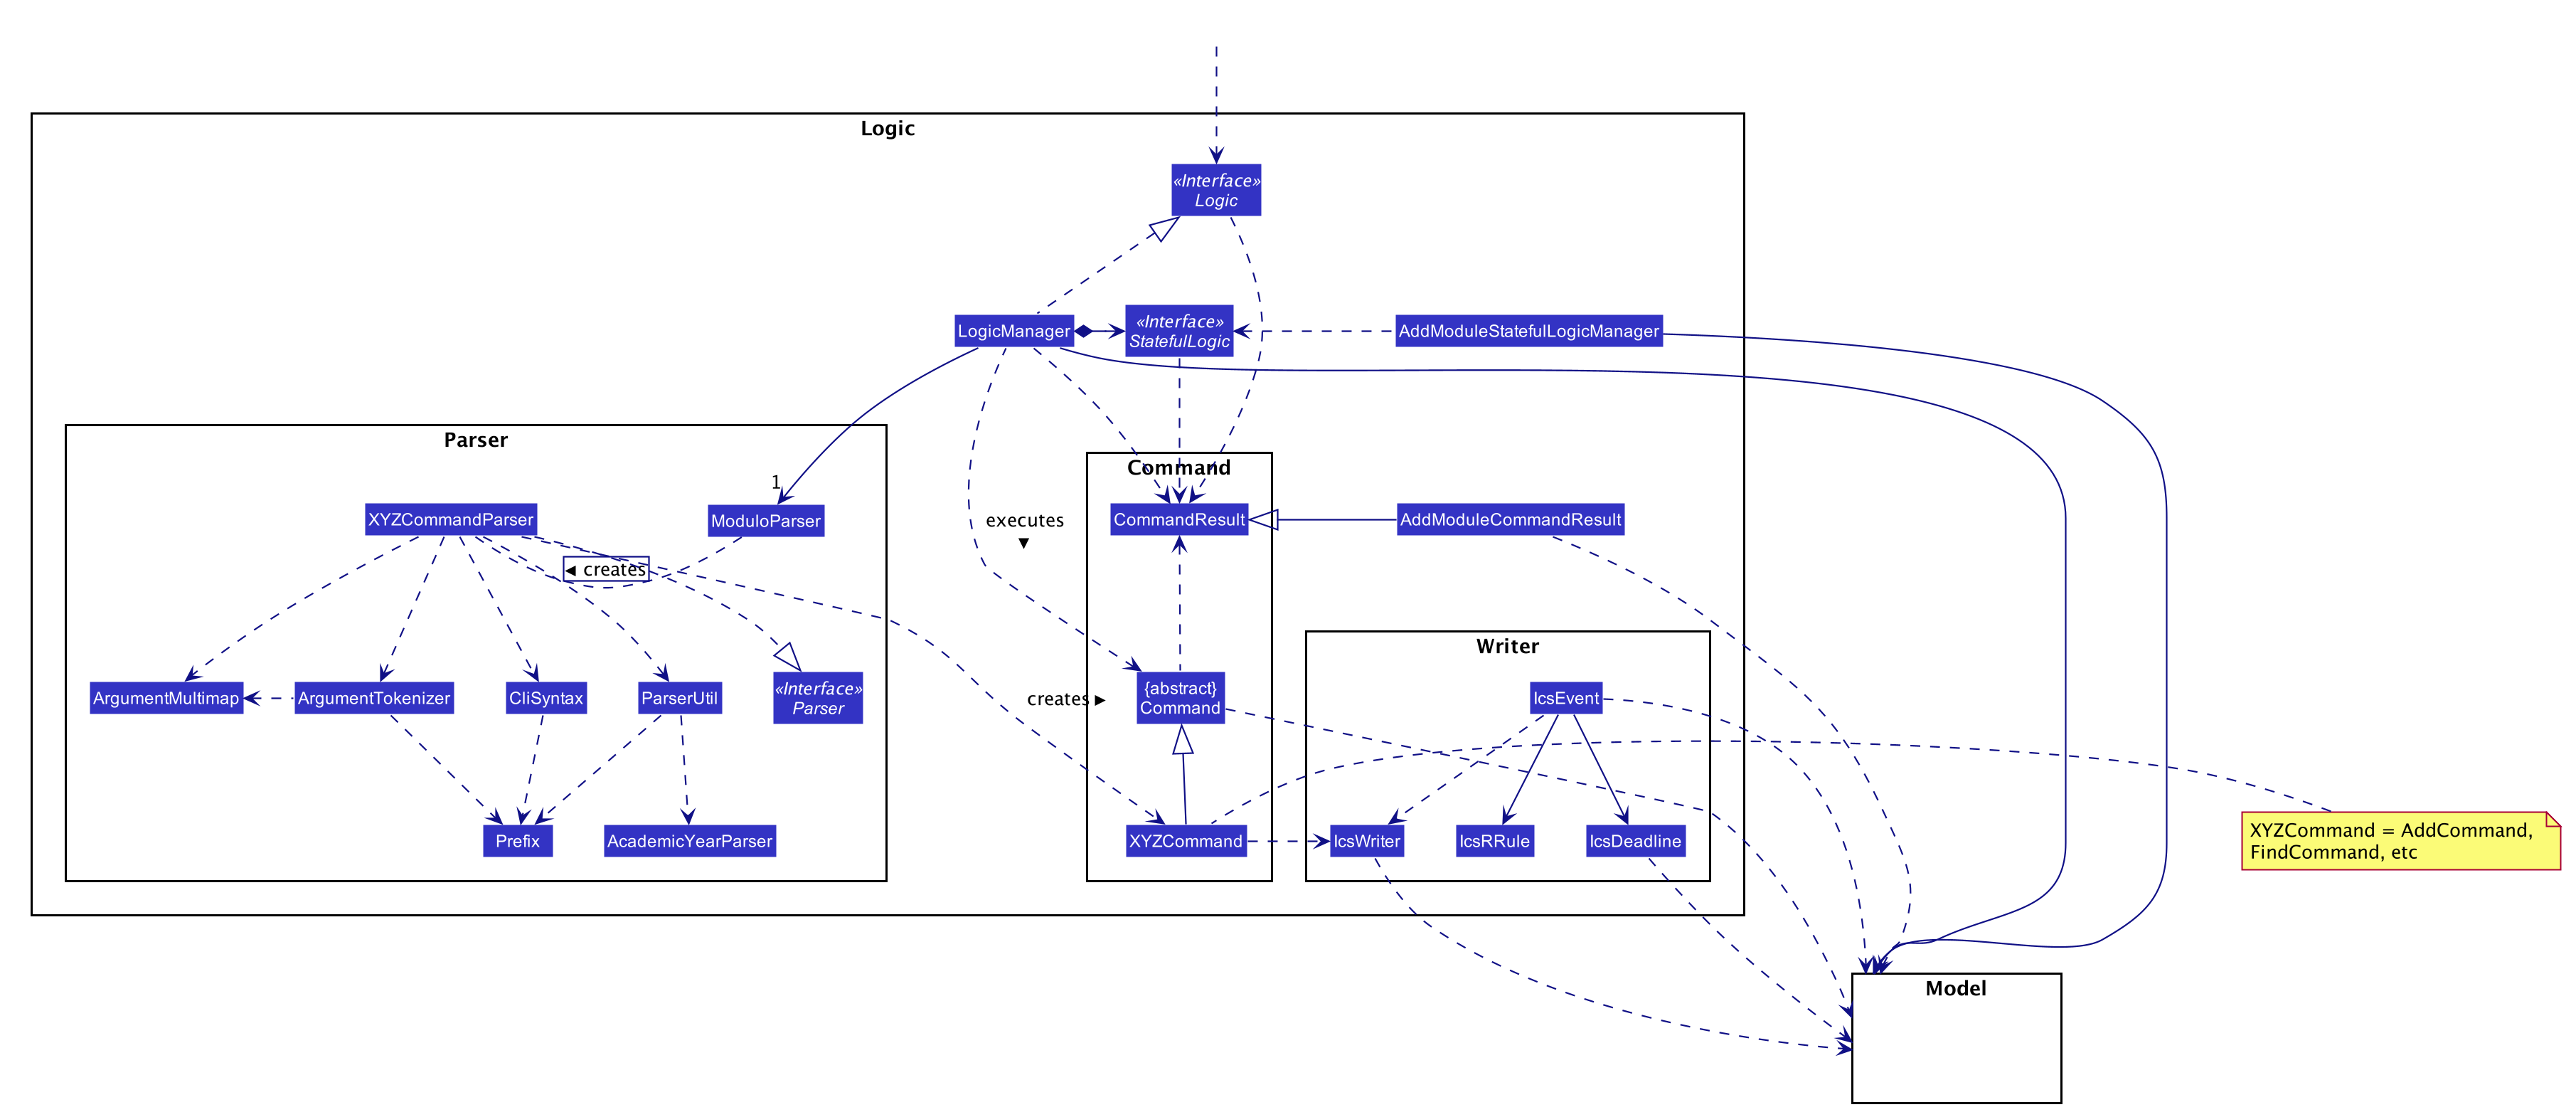
2.3. Logic component
API :
Logic.java
-
Logicuses theModuloParserclass to parse the user command. -
This results in a
Commandobject which is executed by theLogicManager. -
The command execution can affect the
Model(e.g. adding an event). -
The result of the command execution is encapsulated as a
CommandResultobject which is passed back to theUi. -
In addition, the
CommandResultobject can also instruct theUito perform certain actions, such as displaying help to the user.
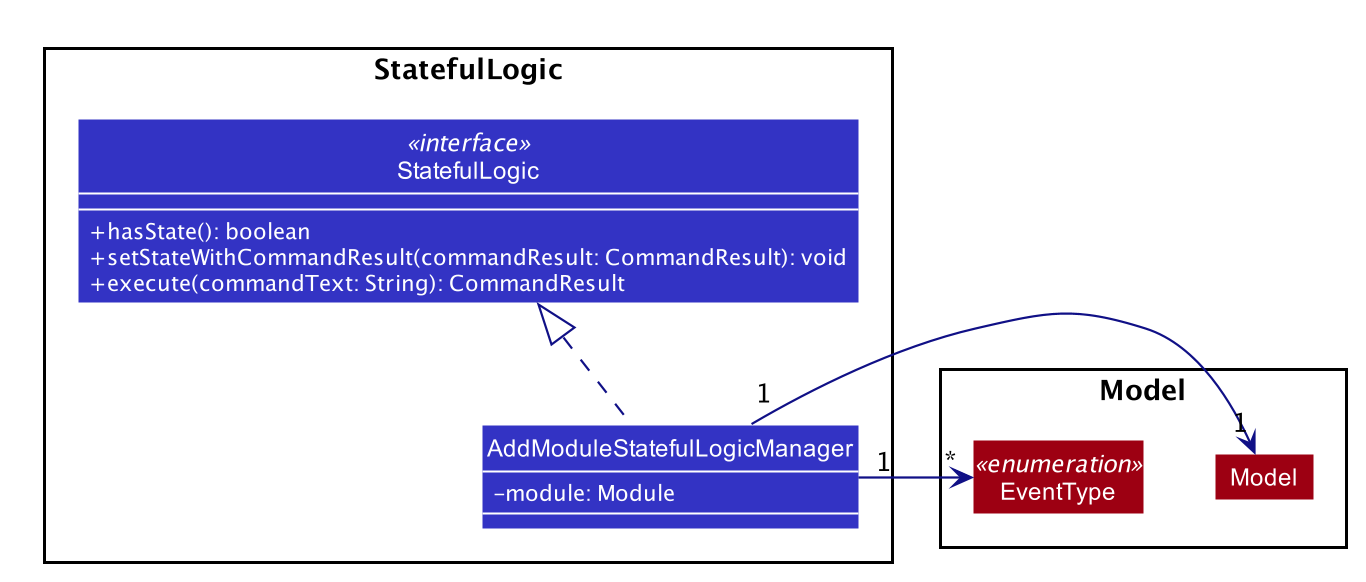
2.3.1. StatefulLogic Interface:
StatefulLogic is implemented by classes that only manages logic while a state exists.
This state would be loaded from special CommandResult subclasses, and allows this StatefulLogicManager to take priority over the default LogicManager.
The exact implementation of state is up to the developer.
Currently, there is only one class that implements it: AddModuleStatefulLogicManager.
Its state is loaded from a special AddModuleCommandResult created by the AddModuleCommand, i.e. when the user uses the
module m/MODULE_CODE command.
The state is created using a list of the event types (tutorial, lecture, lab etc.) that the added module has.
Subsequently, while the list is not empty, the AddModuleStatefulLogicManager handles all inputs, thus allowing Modulo to add the relevant events.
More details on the implementation can be found here.
2.3.2. Writer Component:
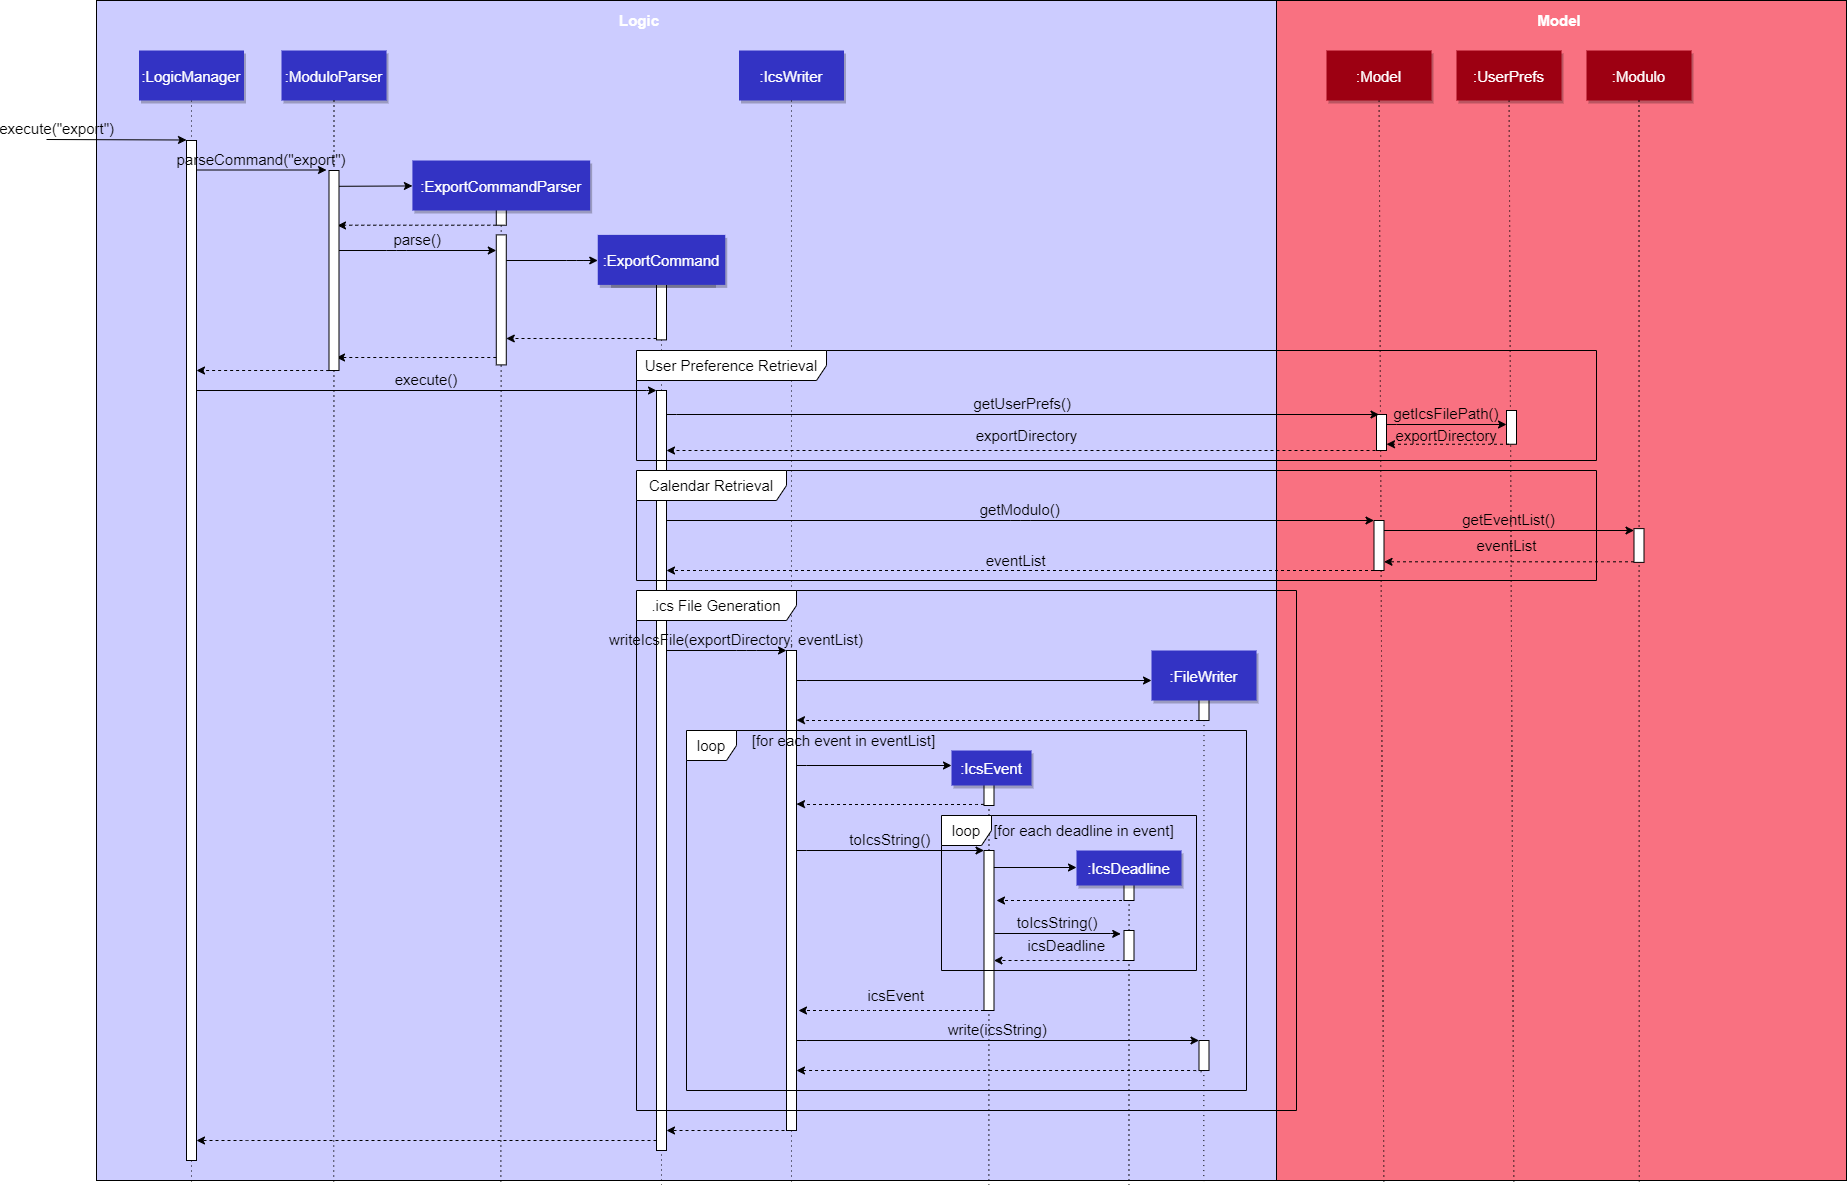
The Writer component is activated when the ExportCommand is executed.
It then calls the writeIcsFile() function from the IcsWriter class which retrieves the current list of events from the Model component which, along with its deadlines, are converted into IcsEvent and IcsDeadline objects, which are then written into the ICS file.
2.3.3. Sample Interactions
Given below is the Sequence Diagram for interactions within the Logic component for the execute("delete 1") API call.
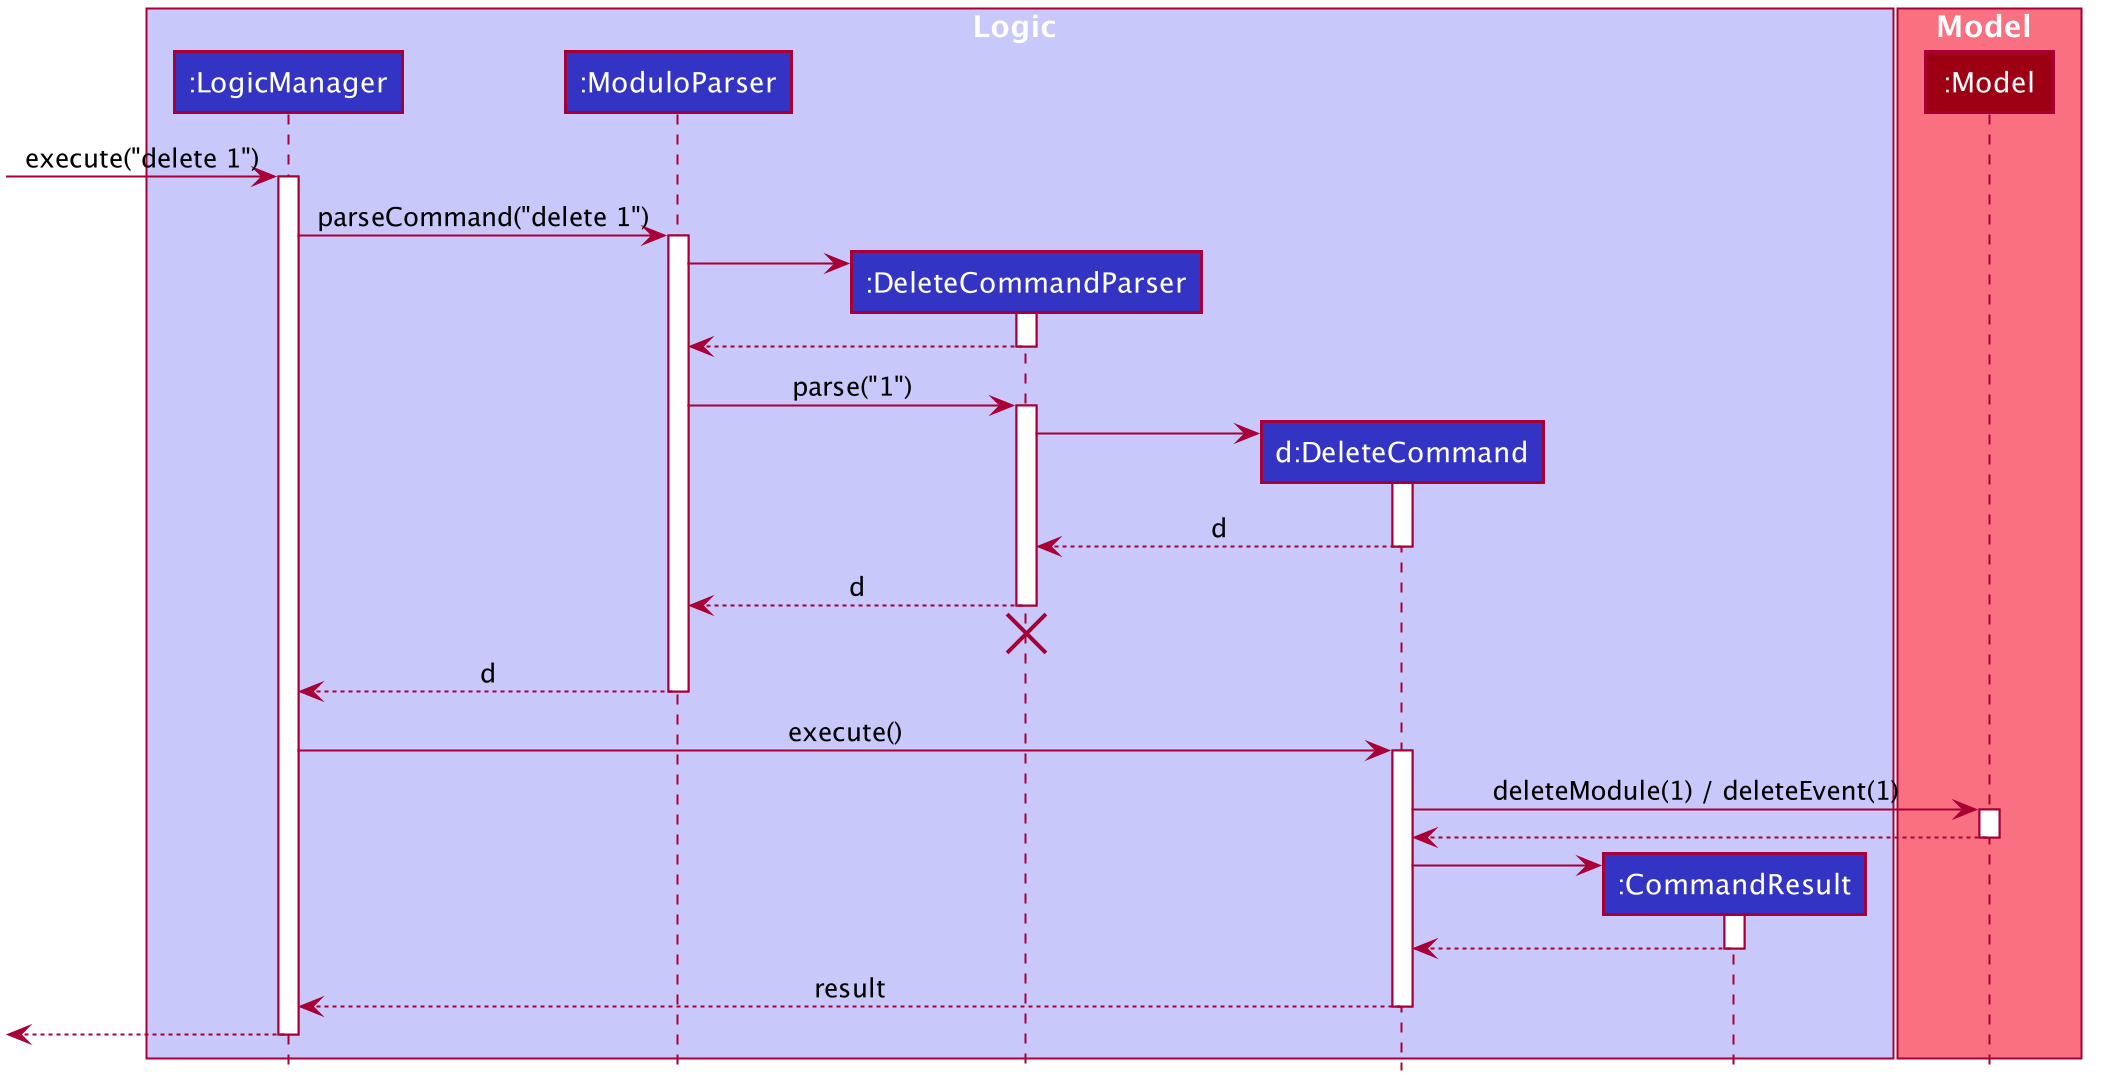
delete 1 Command
The lifeline for DeleteCommandParser should end at the destroy marker (X) but due to a limitation of PlantUML, the lifeline reaches the end of diagram.
|
2.4. Model component
API : Model.java
The Model,
-
stores a
UserPrefobject that represents the user’s preferences. -
stores Modulo data.
-
exposes an unmodifiable
ObservableList<Module>andObservableList<Event>that can be 'observed' e.g. the UI can be bound to these lists so that the UI automatically updates when the data in the lists change. -
does not depend on any of the other three components.
As of now, there are two separate ObservableList being maintained, and with each individual module keeping its own list of events as well.
In the future, to better enable the concept of a single source of truth, we can discard the use of a
ObservableList<Event> and expose solely the unmodifiable ObservableList<Module>, and have events accessed through its parent module. |
Alternatively, we can remove the list of events under each module and instead just maintain the two separate
UniqueModuleList and UniqueEventList.
This may, however, make it costly to render the module list, since we now need to search through the entire list of events to find relevant ones.
|
2.5. Storage component
API : Storage.java
The Storage component,
-
can save
UserPrefobjects in json format and read it back. -
can save the Modulo data in json format and read it back.
2.6. Common classes
Classes used by multiple components are in the modulo.commons package.
3. Implementation
This section describes some noteworthy details on how certain features are implemented.
3.1. Stateful Logic Feature
Multistep commands are facilitated by StatefulLogic.
It is an interface with three methods exposed, and currently only has one class implementing it,
AddModuleStatefulLogicManager.
Let us understand how StatefulLogic works.
3.1.1. How StatefulLogic works
As long as a StatefulLogicManager, which is a class that implements StatefulLogic, has state, it will take over the LogicManager in executing the given String.
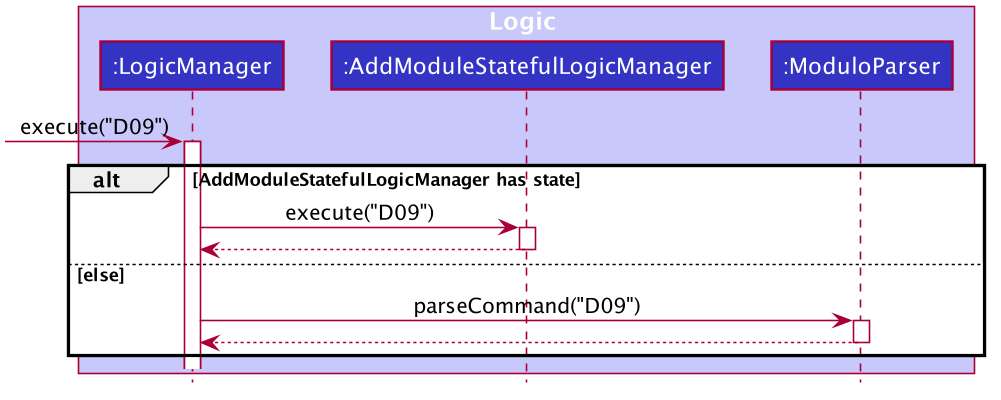
Should there be more StatefulLogicManager instances in play, we will see something like this:
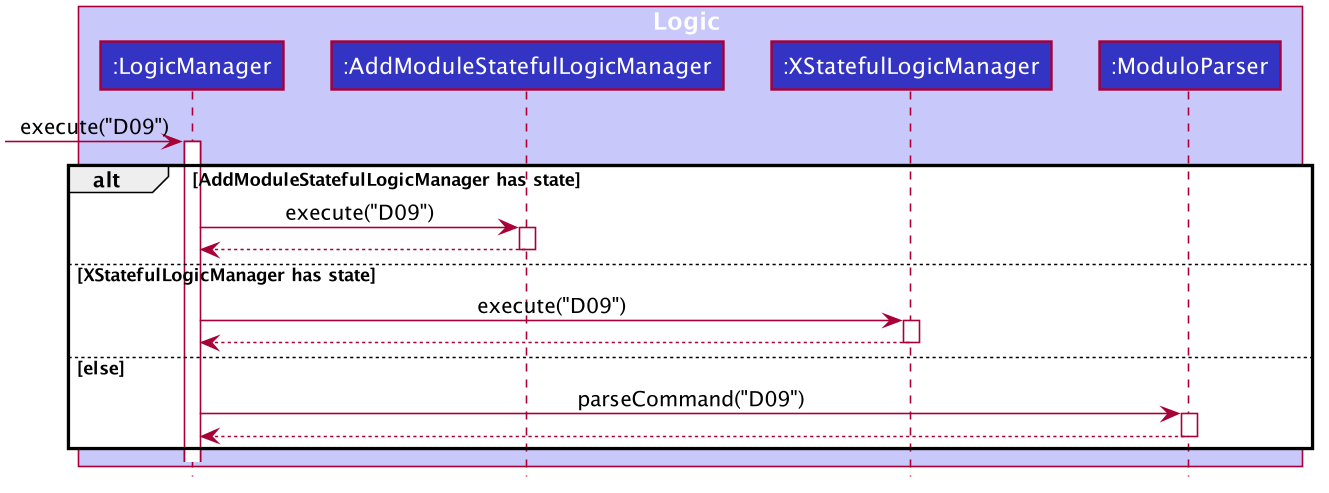
At any point of time, only one StatefulLogicManager will have state.
The LogicManager will thus check through them one by one, and will only directly parse the command itself should no StatefulLogicManager have state.
We can think of these StatefulLogicManager as "consumers" that consume the input if it has state.
The abstraction of how these StatefulLogicManager execute the given String helps to maintain the Single Responsibility Principle.
The interaction between the LogicManager and StatefulLogicManager is also facilitated through the interface,
StatefulLogic, which upholds the Dependency Inversion Principle.
3.1.2. How state is loaded and maintained
State is loaded into StatefulLogicManager using special CommandResult subclasses.
In the instance of the
AddModuleStatefulLogicManager, its state is loaded by passing a AddModuleCommandResult into its
loadStateFromCommandResult method.
Let us take a look at the full process, using AddModuleCommand as an example:
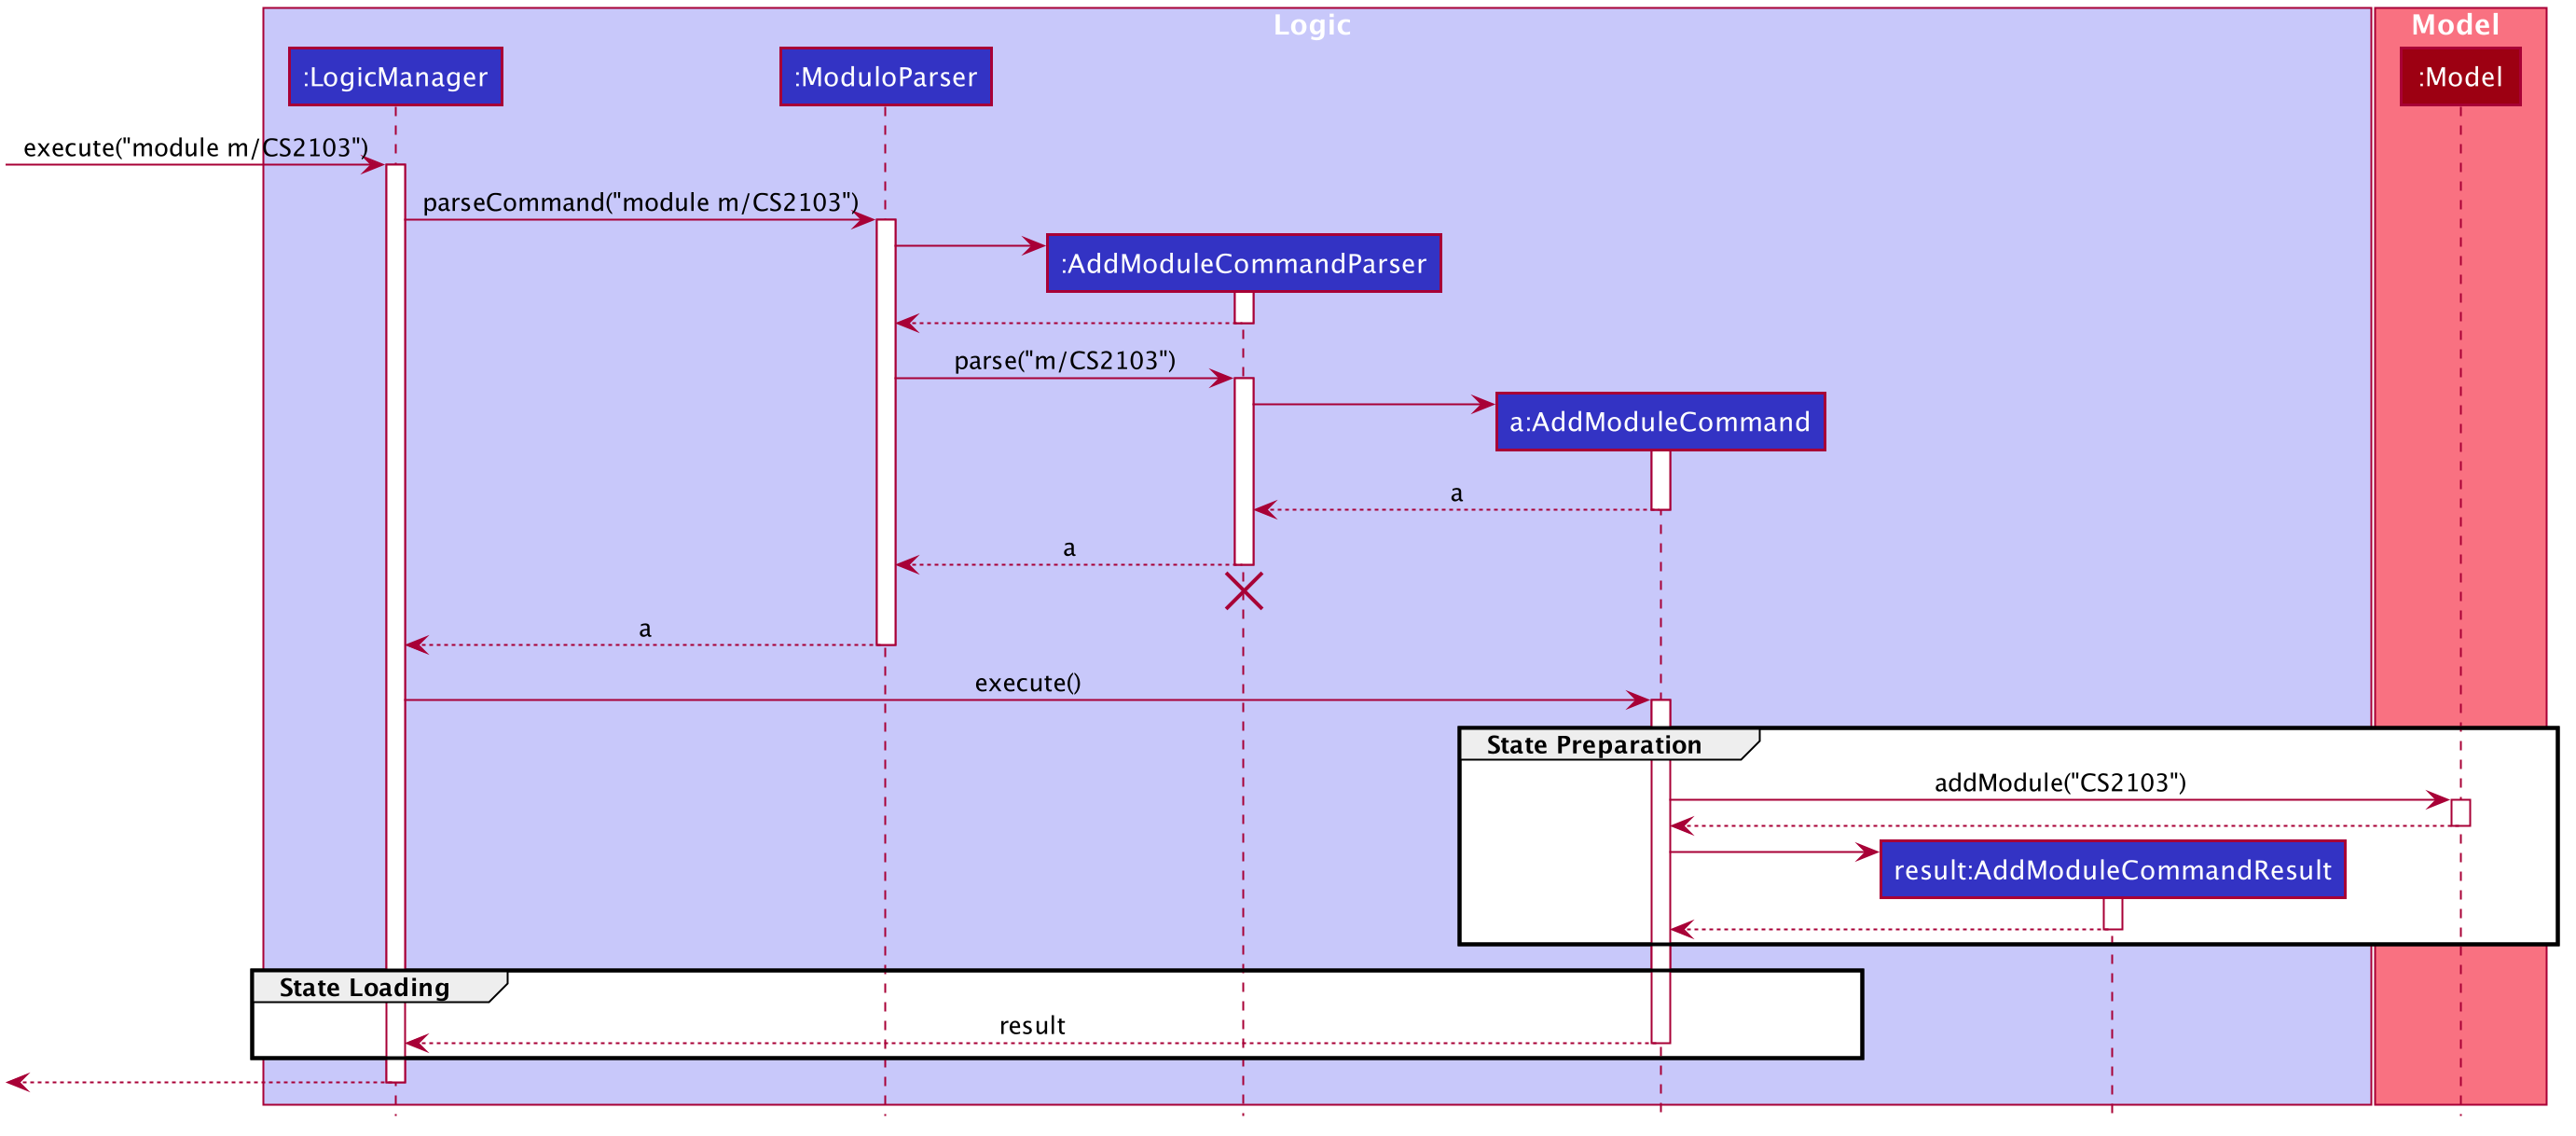
module m/CS2103 commandThere is no difference for the first part from a regular Command execution.
The differences lie in the state preparation and state loading.
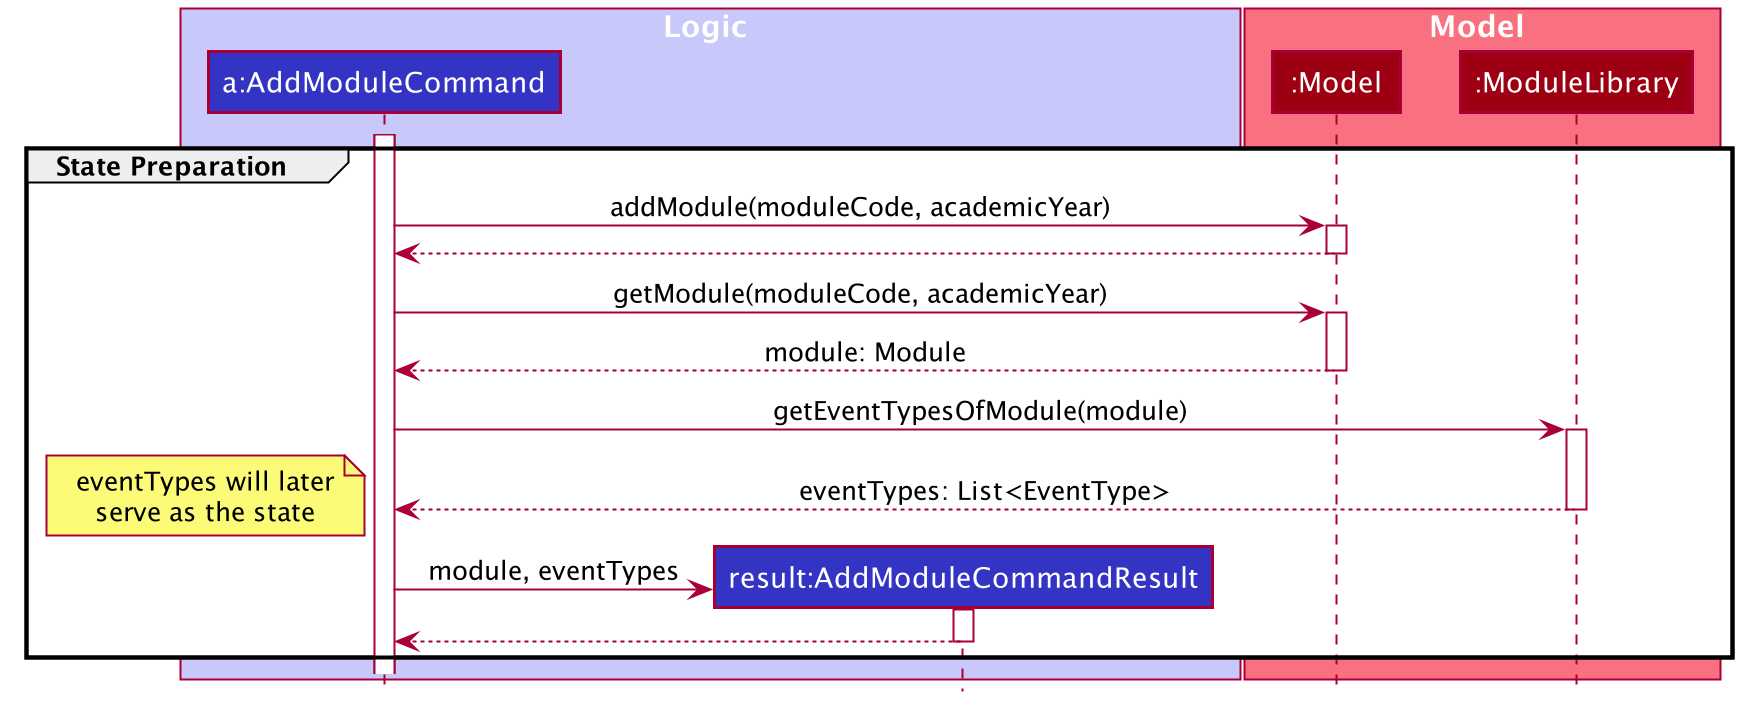
AddModuleCommandResultThe state is prepared during the initialising command, and that command will pack that state into a special subclass of CommandResult.
This CommandResult is then passed back to the default LogicManager.
State loading is then done, if suitable.
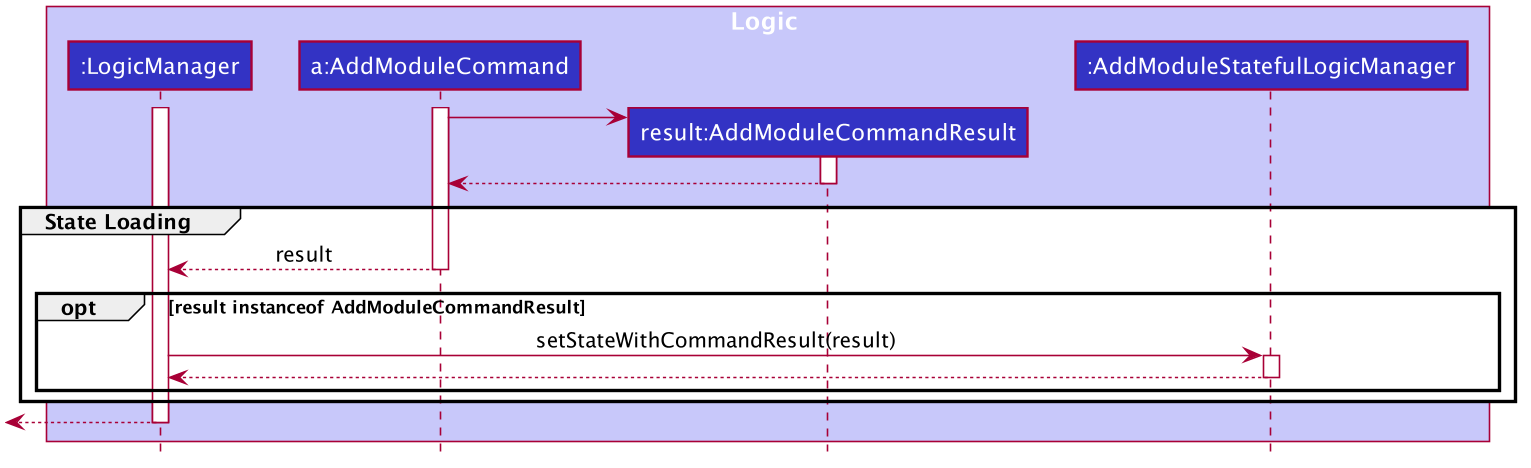
AddModuleStatefulLogicManagerThe eventList is passed on to the AddModuleStatefulLogicManager to be used as state.
As long as the list is not empty, it is considered to have state.
3.1.3. Design Considerations
Aspect: How StatefulLogic should be positioned with respect to Logic
-
Alternative 1 (current choice): Have
StatefulLogicexist as a sub-logic-circuit withinLogicthat activates when conditions are met.-
Pros: Reduce repeated code (DRY) and adheres to the Open Closed Principle, since the use of a simple interface makes it easy to create future
StatefulLogicclasses and integrate them. -
Cons:
Logicnow has to take care of checking for state prior to execution of command, as well as follow up on special subclasses ofCommandResult, thus violating the Single Responsibility Principle.
-
-
Alternative 2: Have
StatefulLogicextendLogicand have a separateLogicDispatcherclass that decides whichLogicto dispatch the command to.-
Pros: Seems to follow the Single Responsibility Principle better.
-
Cons: A lot of repeated code, and to some extent, this may be an adaptation of the current implementation, where the
Logicclass acts as theLogicDispatcher. Furthermore, it may not be correct to say thatLogicandStatefulLogicare similar.StatefulLogicdoes operate quite differently fromLogic.
-
-
Future Extension: It may be worth looking into this and find a better way to handle this logic without breaking the existing Command Pattern. There may be more similarities that can be abstracted out and maximised using OOP.
Aspect: How multistep commands should be implemented and achieved
-
Alternative 1 (current choice): Use
StatefulLogicto keep relevant states and logic together.-
Pros: Uses OOP to reduce complexity. Adheres to the Open Closed Principle, since each class can just implement
StatefulLogic, and the exact management of its state is open. -
Cons:
Logicnow needs to handle the pre and post-command logic.
-
-
Alternative 2: Maintain a global state that
Logiclistens to when executing commands.-
Pros: All commands can push state to this global state without having to go through
Logic, reducing the pre and post-command handling. -
Cons: The implementation of this global state will be highly complex, since the logic required for different states is different as well.
Logicwould be overwhelmed. If a new type of state is required, the changes required will be heavy as well, thus violating the Open Closed Principle.
-
3.2. Done Feature
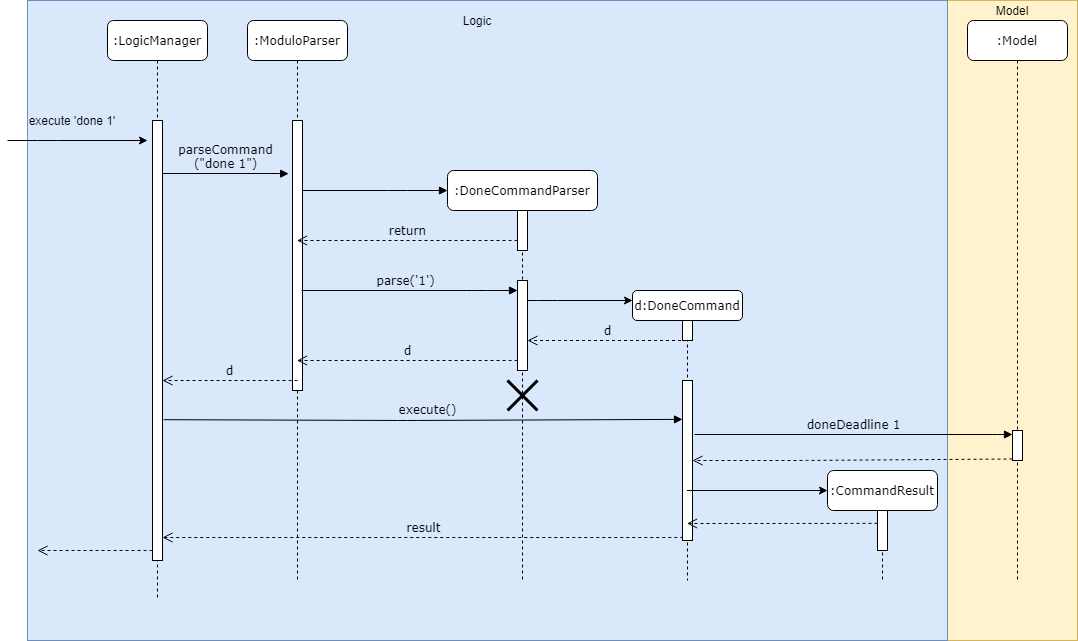
This feature allows the User to set the deadline’s status to be completed or not completed.
The user input is handled and retrieved by the MainWindow class in the Ui component first, before being passed to the LogicManager to execute.
First,LogicManager will call ModuloParser, which will parse the input to give a DoneCommandParser.
Then, DoneCommandParser will return a DoneCommand, which will help to set the status of deadline and update the
Model.
Invalid inputs such as an invalid index (e.g. done 1000) are also handled properly, with suitable error messages being displayed to the user.
The DoneCommand is implemented according to the operation in the Logic module:
-
DoneCommand— Sets the status of the deadline.
For the command, a DoneCommandParser is implemented to parse the input into the required index.
-
DoneCommandParser— Parses thedonecommand input and generates aDoneCommand.
Given below is a sequence diagram to show how the done mechanism behaves at each step.
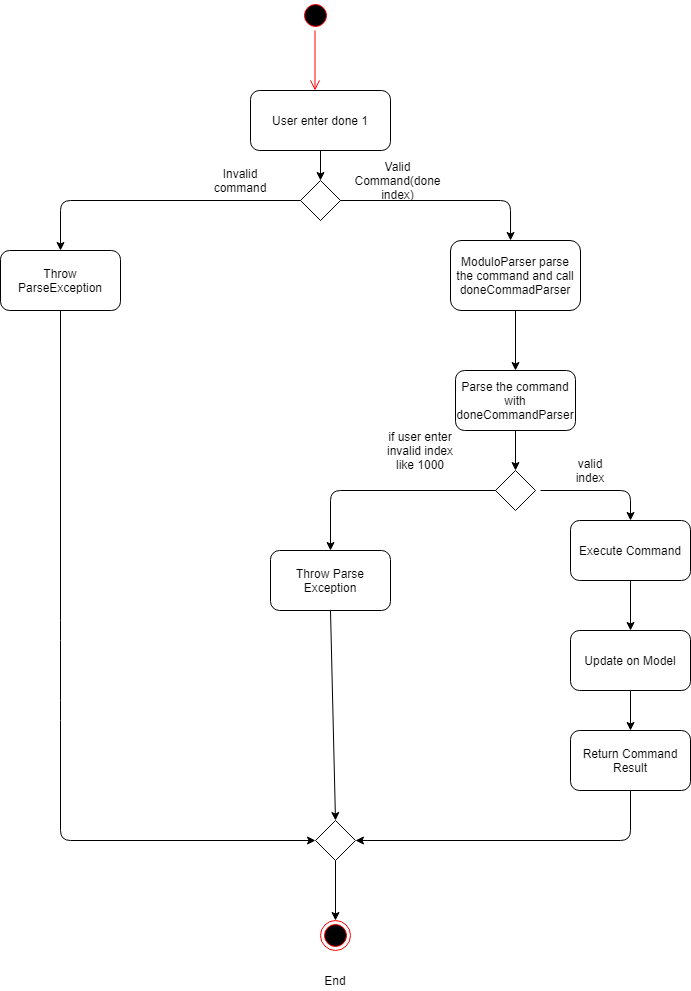
Given below is an activity diagram to show how the done operation works.
3.2.1. Design Considerations
Aspect: How done is executed
-
Alternative 1 (current choice): User can
doneone deadline at a time.-
Pros: Easy to implement and not likely to create bugs.
-
Cons: More steps are required for the user if they wish to complete different deadlines.
-
-
Alternative 2 : User can
donemultiple deadlines at a time.-
Pros: Less time-consuming than if the user were to complete a list of deadlines, one at a time.
-
Cons: User input will be highly complex, as we may need to consider the different use cases, e.g. deadlines of different events, of different modules etc. We will be required to check and account for various possibilities before the operation can be done. Difficult to implement, and even harder to troubleshoot if bugs occur.
-
Other considerations
-
Modulo will keep track of all the deadlines' statuses and send reminders to the user accordingly.
-
Pros: A good feature that helps to remind users of their incomplete deadlines.
-
Cons: Hard to implement and it increases coupling. Difficult to write test cases as well.
-
-
Future Extension: Modulo can have another UI panel to display every deadline that needs to be done a certain week. The user can then use the
donecommand to update the deadlines' statuses from there.
3.3. Export Feature
Modulo supports exporting user’s calendar to .ics file format to facilitate data transfer between different scheduling platforms.
By using a simple FileWriter class and generating the .ics entities, we’re able to generate an .ics file that can be consumed by commonly used platforms (e.g. Google Calendar)
An overview of the process is shown as below through the triggering of ExportCommand:
3.3.1. Design Considerations
Aspect: How Deadline should be exported together with Event
Event entities can be mapped to VEVENT .ics type, but there is a lack of suitable counterparts for deadline.
-
Alternative 1: Export
Deadlineas VTODO-
Pros: Deadline has its standalone VTODO .ics item type.
-
Cons: Some popular calendar applications do not support VTODO importing, thus making users lose out on important information regarding events.
-
-
Alternative 2: Export
Deadlinewithin the description of eachEvent-
Pros: Users are able to see at a glance what are the
Deadlinefor eachEventeasily -
Cons: Users are unable to take advantage of VTODO import functionality of certain calendar application.
-
-
Alternative 3 (current choice): Combine both options Users are able to make full use of .ics importing capabilities, while also providing a quick overview of
Deadline
3.4. Module / Event / Deadline Deletion Feature
This Deletion feature allows the user to delete modules, events or deadlines.
The user input is first retrieved by the MainWindow class which is then passed to the LogicManager via the execute
function.
LogicManager will call the parseCommand function of ModuloParser`, which will parse the input to create a temporary DeleteCommandParser object, parsing the input and returning a DeleteCommand.
The command will then be executed in the LogicManager, returning a CommandResult object which will then be returned as feedback to the user.
Given below is a sequence diagram to show how the delete feature parsing an input of '1' behaves at each step:
Given below is an activity diagram to show how the delete operation works.

3.4.1. Design Considerations
Aspect: How delete may be executed
-
Alternative 1 (current choice): User can delete multiple items using the command at the same time.
-
Pros: Allows the user more flexibility in deleting modules and events instead of just deleting them one by one. For example users can choose to delete one, many or even all modules and events, depending on their command input.
-
Cons: This has caused the code to become more complex in dealing with the many possible inputs and scenarios, leading to a higher amount of potential errors.
-
| With respect to deadlines, users can only delete one or all deadlines of a particular event. This is to avoid any confusion and unnecessary complexity which may be caused by deleting deadlines across all events, especially since the user may only observe deadlines of one event at any one time and do not have access to the overall list of deadlines. |
-
Alternative 2 : User can
deleteonly one or all items.-
Pros: Reduces the lack of potential errors due to the decreased complexity of the code.
-
Cons: It is less intuitive for the user as users are now limited by deleting one or all the events / modules / deadlines.
-
-
Future Extension: Modulo can have another UI panel to display every deadline that needs to be done a certain week. The user can then use the
deletecommand to delete multiple deadlines at one go, making it more convenient for the user.
3.5. [Proposed] Edit Feature
Currently, Modulo does not allow for the editing of the details of events and deadlines that have been created.
3.5.1. Proposed Implementation
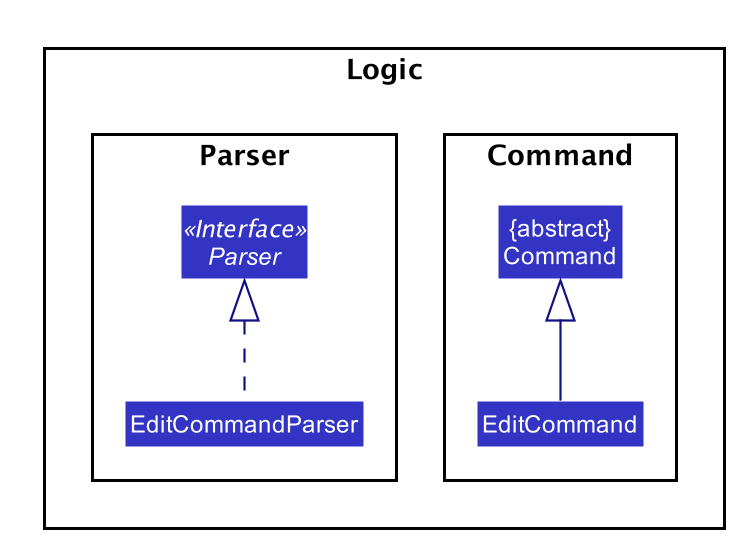
The Edit functionality will be achieved through the introduction of an EditCommand and its parser EditCommandParser.
The edit command will have the following format:
-
Editing events:
edit n/EVENT_NAME m/MODULE_CODE [nn/NEW_NAME] [s/NEW_START_DATETIME] [e/NEW_END_DATETIME] [v/NEW_VENUE] -
Editing deadlines:
edit d/INDEX m/MODULE_CODE e/EVENT_NAME nn/NEW_NAME
The flow of the command parsing will be as such:
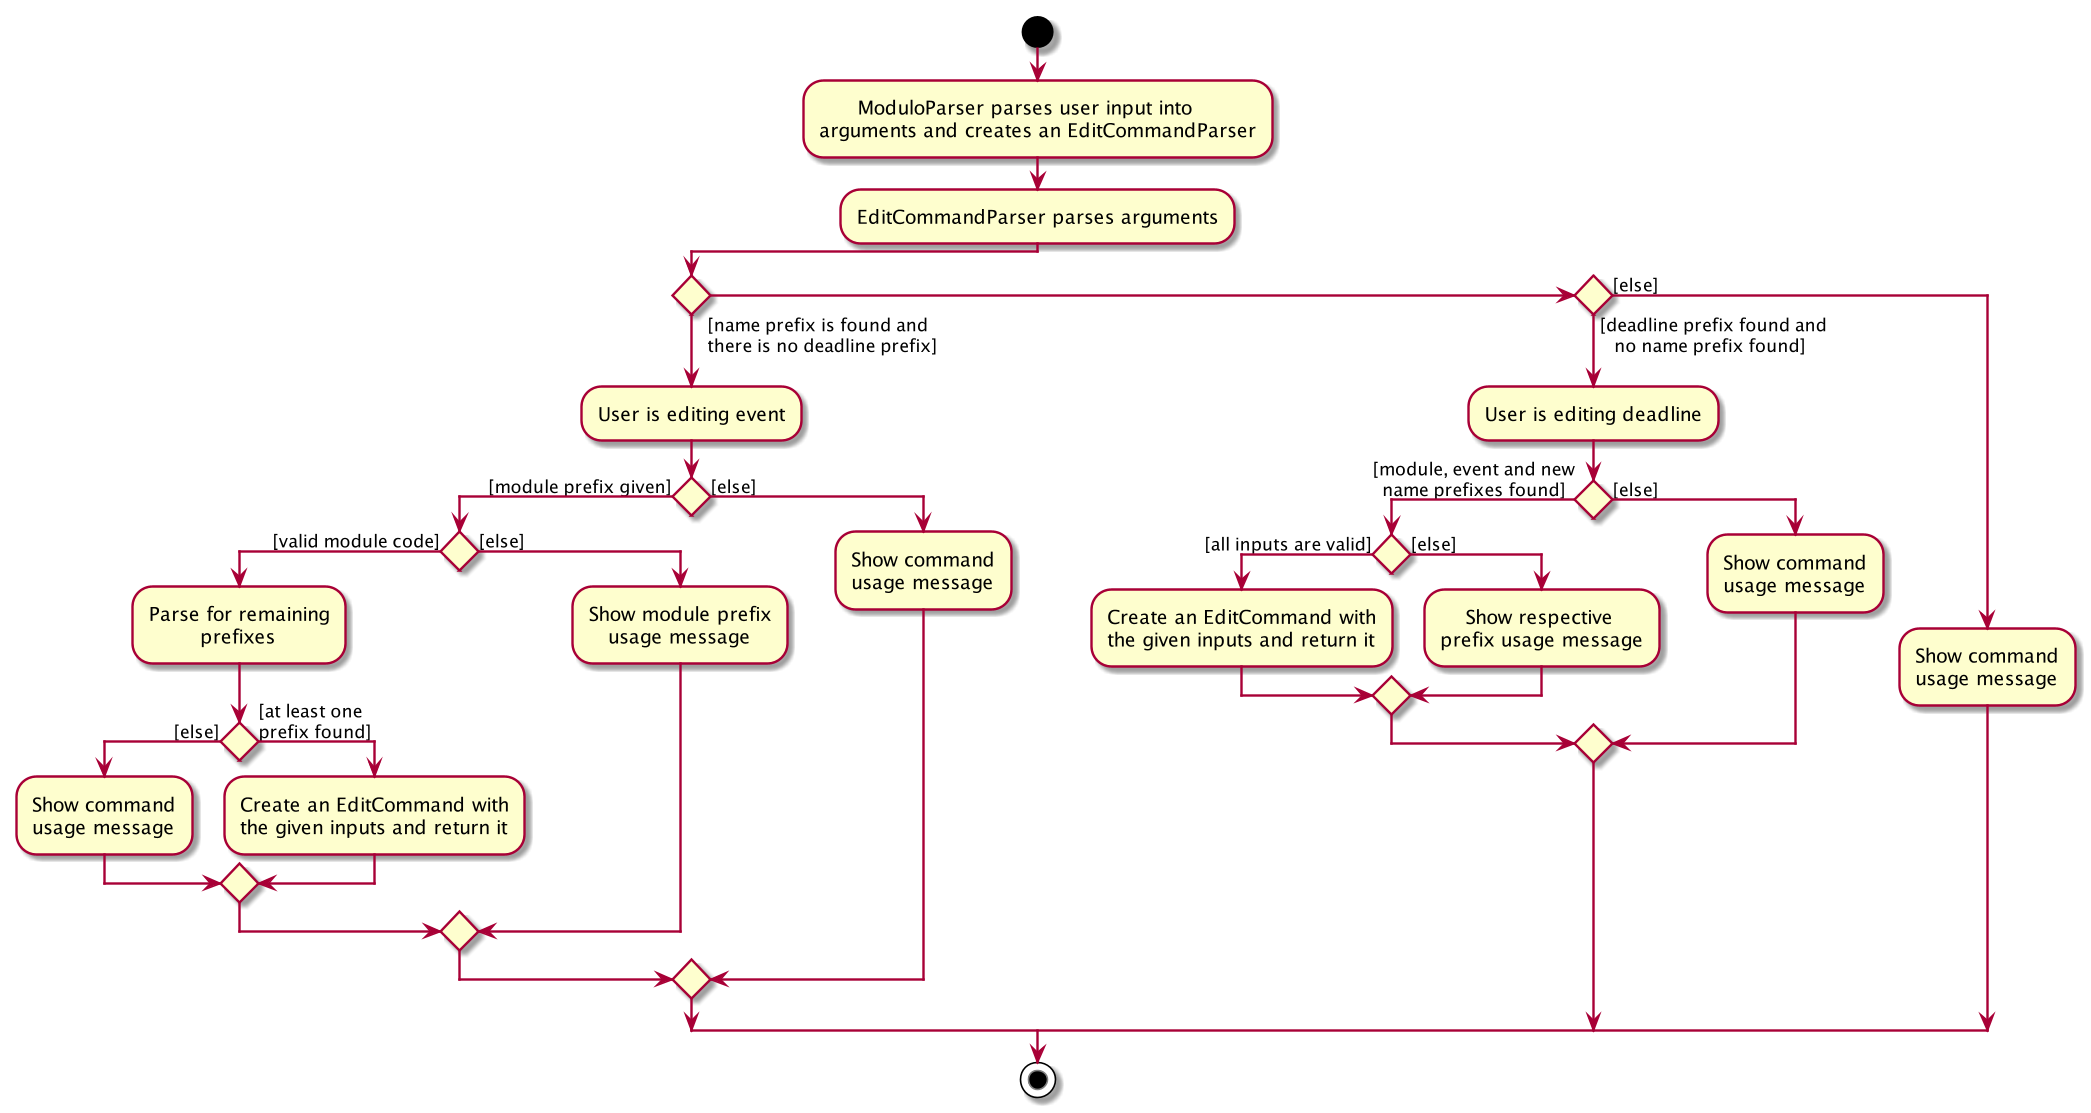
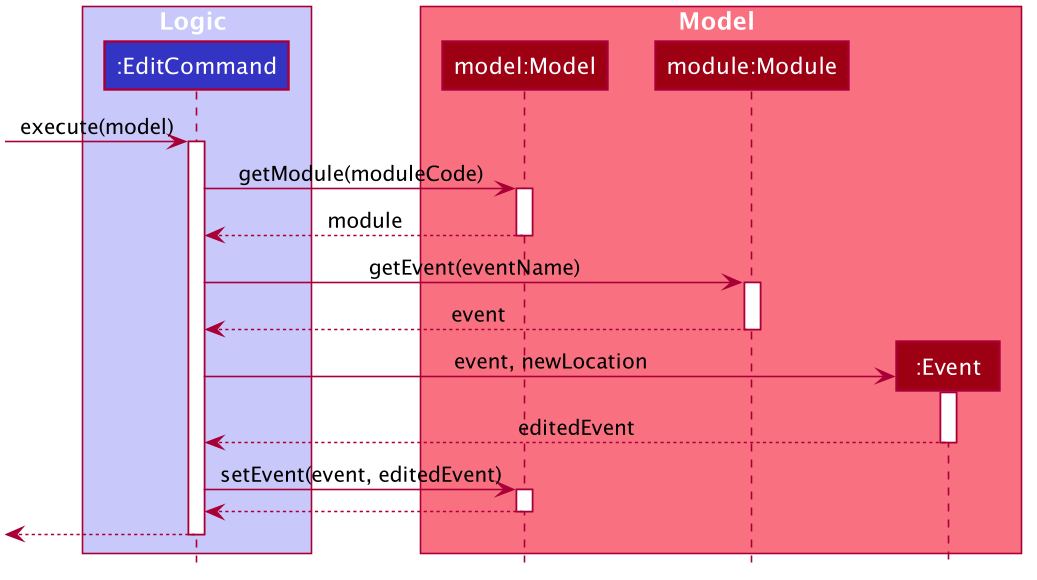
If an EditCommand is successfully created, it will be executed on the Model.
It will work mainly through the
setEvent method already exposed in the Model interface, as well as a setDeadline that will be exposed through the parent event.
Here’s an example of how it may look like if the EditCommand was to modify an event’s venue.
User input: edit n/Tutorial 1 m/CS2103 v/Home
3.5.2. Limitations
Due to the fact that repeated events are not currently being tagged or grouped in any way, it is difficult to allow mass editing of repeated events.
If there’s a need to edit a repeated event, there would be a need to edit the events one by one.
3.5.3. Design Considerations
Aspect: How to easily modify deadlines
-
Alternative 1 (current choice): Manually fetch the deadline from the event and replace.
-
Pros: Easy to implement.
-
Cons: May have slight performance issues in terms of speed, and a lot of coding to be done.
-
-
Alternative 2: Consolidate the deadlines in a UniqueDeadlineList.
-
Pros: Less code to write for this feature specifically, in terms of the
setDeadlinemethod. -
Cons: Increases complexity of the application, since now three lists are maintained. There is also the same issue with events and modules in terms of the source of truth.
-
3.6. [Proposed] Undo/Redo Feature
3.6.1. Proposed Implementation
The undo/redo mechanism is facilitated by VersionedModulo.
It extends Modulo with an undo/redo history, stored internally as an moduloStateList and currentStatePointer.
Additionally, it implements the following operations:
-
VersionedModulo#commit()— Saves the current modulo state in its history. -
VersionedModulo#undo()— Restores the previous modulo state from its history. -
VersionedModulo#redo()— Restores a previously undone modulo state from its history.
These operations are exposed in the Model interface as Model#commitModulo(), Model#undoModulo() and
Model#redoModulo() respectively.
Given below is an example usage scenario and how the undo/redo mechanism behaves at each step.
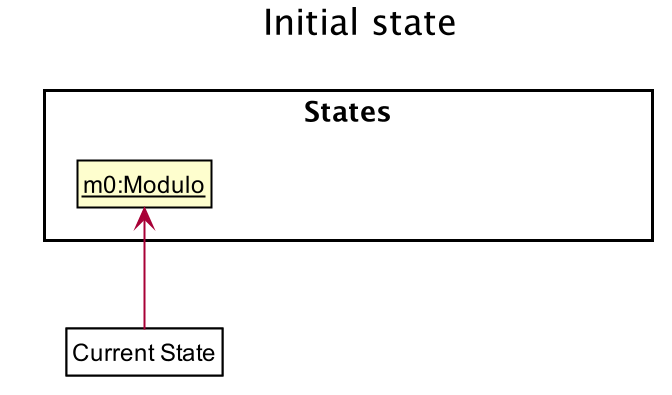
Step 1. The user launches the application, toggles to the event list and views an event.
The VersionedModulo will be initialized with the initial modulo state, and the currentStatePointer pointing to that single modulo state.
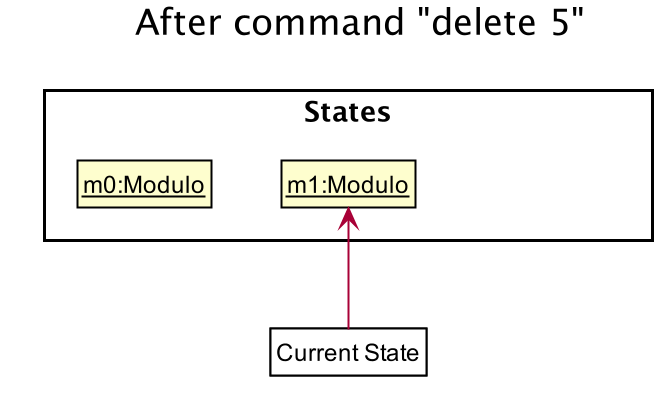
Step 2. The user executes delete 5 command to delete the 5th event in Modulo.
The delete command calls Model#commitModulo(), causing the modified state of Modulo after the delete 5
command executes to be saved in the moduloStateList, and the currentStatePointer is shifted to the newly inserted Modulo state.
Step 3. The user executes deadline n/Draw UML to add a new deadline to the viewed event.
The deadline command also calls Model#commitModulo(), causing another modified modulo state to be saved into the moduloStateList.
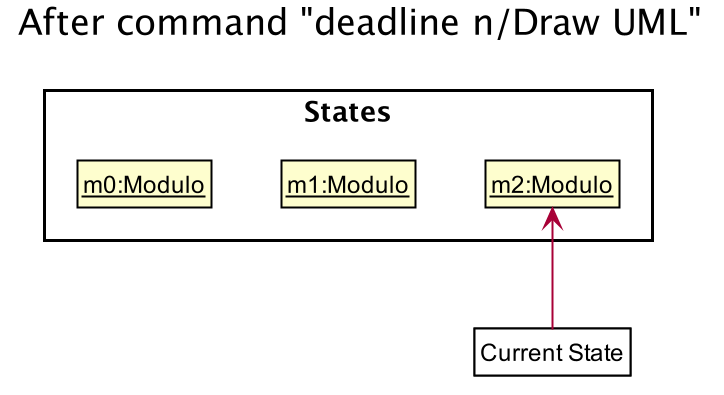
If a command fails its execution, it will not call Model#commitModulo(), so the Modulo state will not be saved into the moduloStateList.
|
Step 4. The user now decides that adding the deadline was a mistake, and decides to undo that action by executing the
undo command.
The undo command will call Model#undoModulo(), which will shift the currentStatePointer once to the left, pointing it to the previous Modulo state, and restores Modulo to that state.
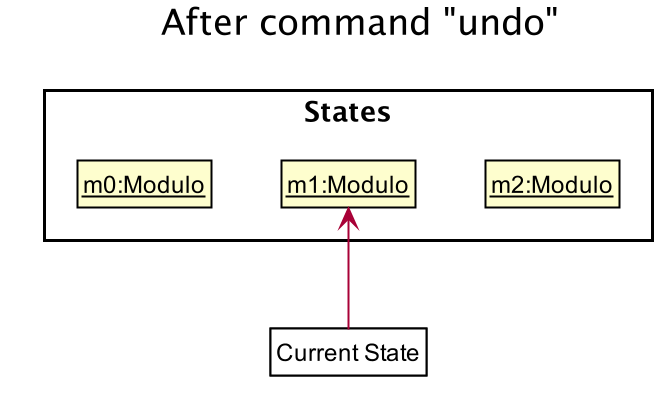
If the currentStatePointer is at index 0, pointing to the initial Modulo state, then there are no previous Modulo states to restore.
The undo command uses Model#canUndoModulo() to check if this is the case.
If so, it will return an error to the user rather than attempting to perform the undo.
|
The following sequence diagram shows how the undo operation works:
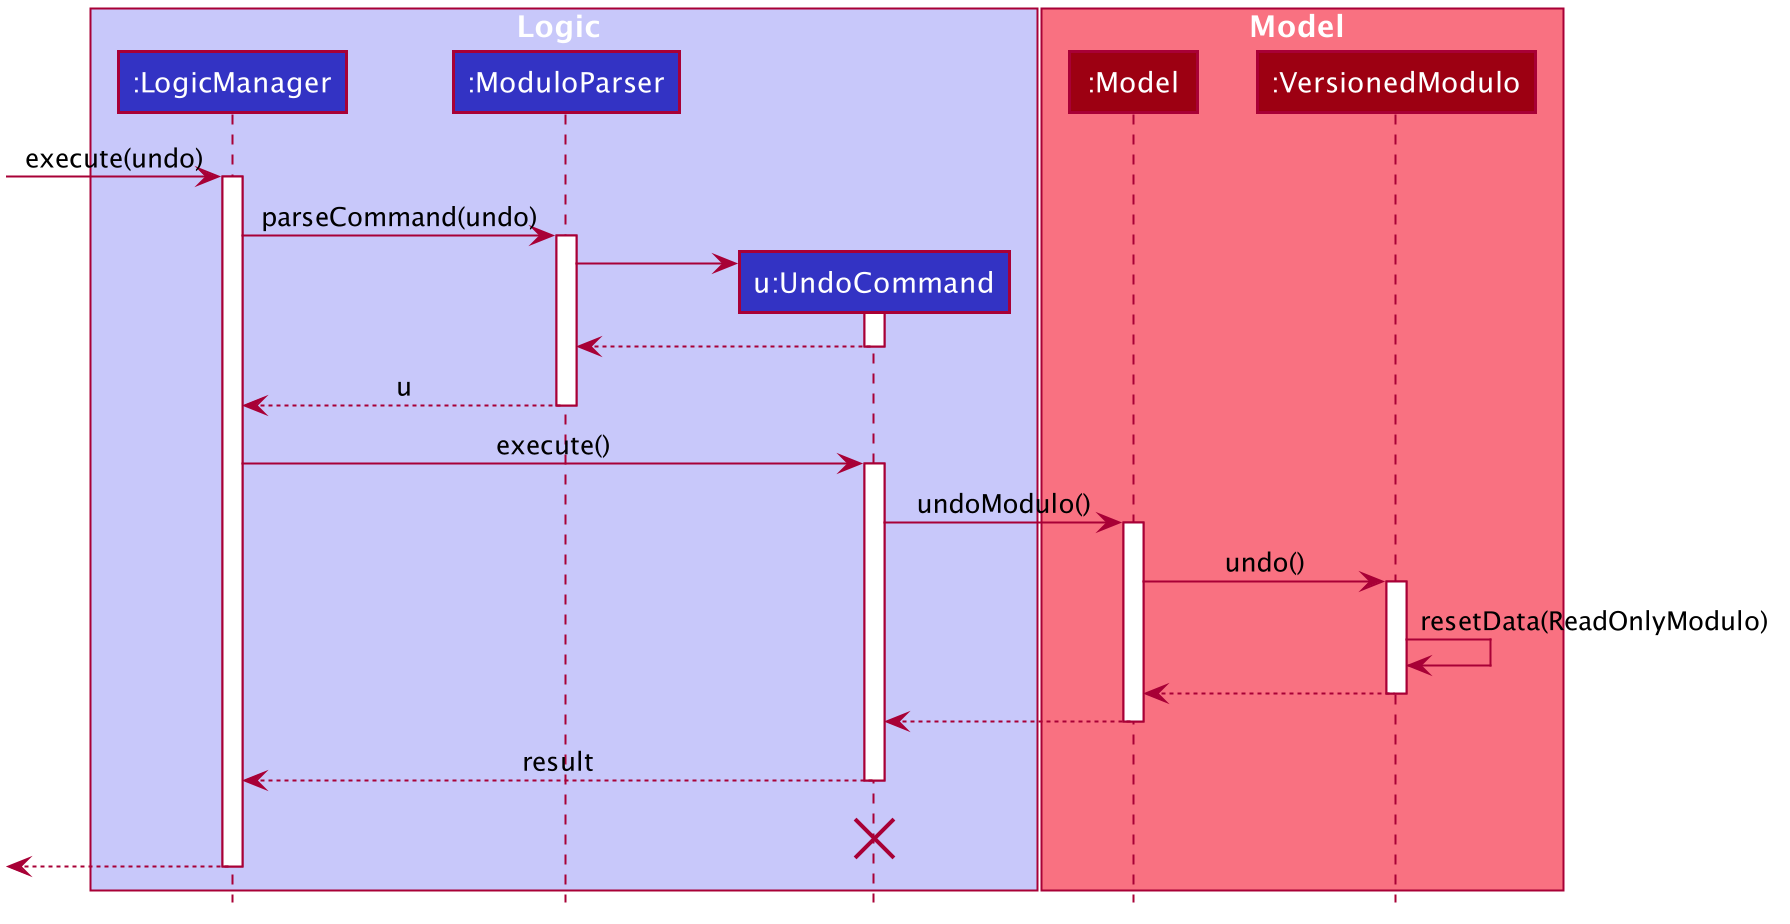
The lifeline for UndoCommand should end at the destroy marker (X) but due to a limitation of PlantUML, the lifeline reaches the end of diagram.
|
The redo command does the opposite — it calls Model#redoModulo(), which shifts the currentStatePointer once to the right, pointing to the previously undone state, and restores Modulo to that state.
If the currentStatePointer is at index moduloStateList.size() - 1, pointing to the latest Modulo state, then there are no undone Modulo states to restore.
The redo command uses Model#canRedoModulo() to check if this is the case.
If so, it will return an error to the user rather than attempting to perform the redo.
|
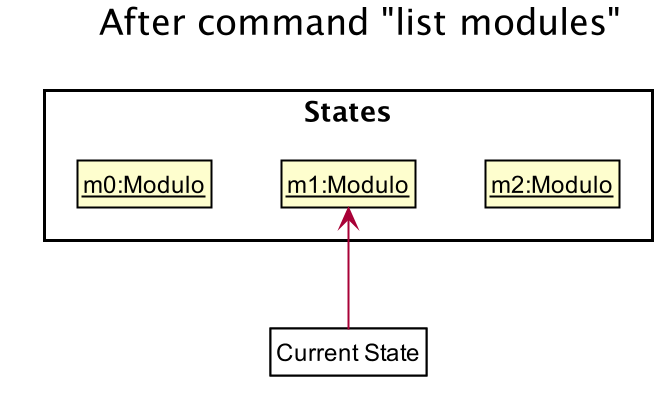
Step 5. The user then decides to execute the command list modules.
Commands that do not modify Modulo, such as list, will usually not call Model#commitModulo(),
Model#undoModulo() or Model#redoModulo().
Thus, the moduloStateList remains unchanged.
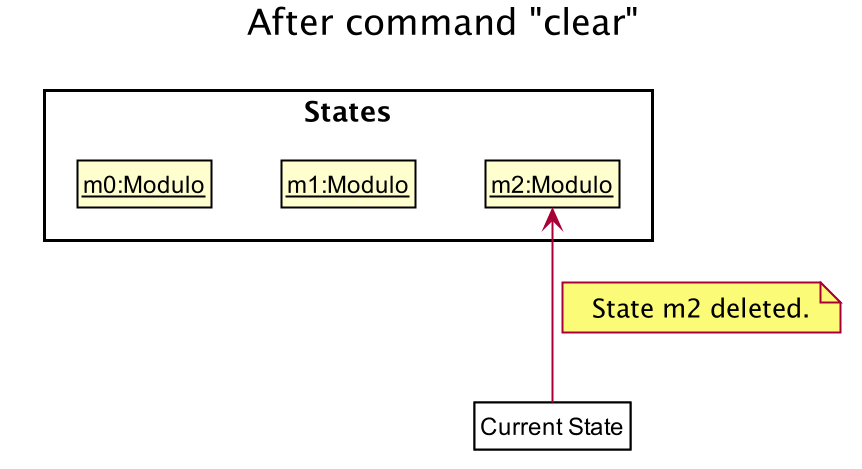
Step 6. The user executes clear, which calls Model#commitModulo().
Since the currentStatePointer is not pointing at the end of the moduloStateList, all modulo states after the
currentStatePointer will be purged.
We designed it this way because it no longer makes sense to redo the deadline n/Draw UML command.
This is the behavior that most modern desktop applications follow.
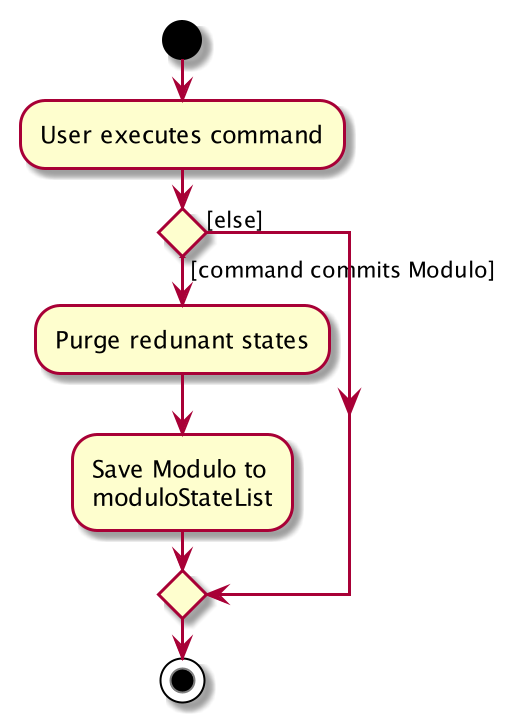
The following activity diagram summarizes what happens when a user executes a new command:
3.6.2. Design Considerations
Aspect: How undo & redo executes
-
Alternative 1 (current choice): Saves the entire Modulo.
-
Pros: Easy to implement.
-
Cons: May have performance issues in terms of memory usage.
-
-
Alternative 2: Individual command knows how to undo/redo by itself.
-
Pros: Will use less memory (e.g. for
delete, just save the deadline being deleted). -
Cons: We must ensure that the implementation of each individual command are correct.
-
Aspect: Data structure to support the undo/redo commands
-
Alternative 1 (current choice): Use a list to store the history of Modulo states.
-
Pros: Easy for new Computer Science student undergraduates to understand, who are likely to be the new incoming developers of our project.
-
Cons: Logic is duplicated twice. For example, when a new command is executed, we must remember to update both
HistoryManagerandVersionedModulo.
-
-
Alternative 2: Use
HistoryManagerfor undo/redo-
Pros: We do not need to maintain a separate list, and just reuse what is already in the codebase.
-
Cons: Requires dealing with commands that have already been undone: We must remember to skip these commands. Violates Single Responsibility Principle and Separation of Concerns as
HistoryManagernow needs to do two different things.
-
3.7. Logging
We are using java.util.logging package for logging.
The LogsCenter class is used to manage the logging levels and logging destinations.
-
The logging level can be controlled using the
logLevelsetting in the configuration file (See Section 3.8, “Configuration”) -
The
Loggerfor a class can be obtained usingLogsCenter.getLogger(Class)which will log messages according to the specified logging level -
Currently log messages are output through:
Consoleand to a.logfile.
Logging Levels
-
SEVERE: Critical problem detected which may possibly cause the termination of the application -
WARNING: Can continue, but with caution -
INFO: Information showing the noteworthy actions by the App -
FINE: Details that is not usually noteworthy but may be useful in debugging e.g. print the actual list instead of just its size
3.8. Configuration
Certain properties of the application can be controlled (e.g user prefs file location, logging level) through the configuration file (default: config.json).
4. Documentation
Refer to the guide here.
5. Testing
Refer to the guide here.
6. Dev Ops
Refer to the guide here.
Appendix A: Product Scope
Target user profile:
-
has a need to manage their modules and the deadlines for these modules
-
prefer desktop apps over other types of apps
-
can type fast and prefers typing over mouse input
-
is reasonably comfortable using CLI apps
-
is a current NUS student who is taking modules in AY19/20 Sem 2
Value proposition: Manage modules and related deadlines faster than a typical mouse/GUI driven app
Appendix B: User Stories
Priorities: High (must have) - * * *, Medium (nice to have) - * *, Low (unlikely to have) - *
| Priority | As a … | I want to … | So that I can… |
|---|---|---|---|
|
new user |
see usage instructions |
refer to instructions when I forget how to use Modulo |
|
user |
view my events by week |
never miss any event |
|
user |
view the deadlines of my events |
can know the deadlines I have |
|
user |
view class slots (e.g. tutorial) of my events |
remember which class slot I signed up for |
|
busy user |
create deadlines |
ensure I do not miss any of my module / assignment deadlines |
|
user |
complete deadlines |
track the work I have done |
|
user |
set routine deadlines based on events |
routinely prepare for these events |
|
user |
categorise my work based on module |
don’t have to manually categorise myself |
|
user |
add events to modules easily |
get started on deadline planning earlier |
|
user |
delete modules / events / deadlines |
if I finished doing them or made an error while adding them |
|
busy user |
delete all modules / events / deadlines |
if I want to save time |
|
user |
find modules / events according to keyword |
find modules / events are relevant to me |
|
user |
export my data from this app |
access the data I’ve created from anywhere |
{More to be added}
Appendix C: Use Cases
(For all use cases below, the System is Modulo and the Actor is the user, unless specified otherwise)
Use case: UC01 - Add a deadline
MSS Preconditions: Module data file is loaded properly.
Guarantees: Deadline is added under the correct module and event, with the correct details.
-
User adds a module (UC02).
-
User adds a deadline to the correct module and event, with all the required details.
-
Modulo shows the newly created deadline.
Use case ends.
Extensions
-
2a. User enters incorrect information.
-
2a1. Modulo shows user the correct format for the deadline creation.
-
2a2. User enters new information following the correct format.
Use case resumes from step 3.
-
Use case: UC02 - Add a module
MSS Preconditions: Module data files are loaded properly.
Guarantees: Module is added to the user’s Modulo.
-
User enters a module code, e.g. CS2103.
-
Modulo searches its data files for the module and creates the module using information from the data files.
-
Modulo prompts user to enter the slot for an event type.
-
User enters their slot for the event type.
Steps 3-4 are repeated for as many times as required until the User has entered slots for all event types of the module. -
Modulo shows the newly created module.
Use case ends.
Extensions
-
1a. User enters incorrect data and the wrong module is found.
-
1a1. Steps 2 to 4 are performed.
-
1a2. User deletes the added module (UC03) and its events.
Use case resumes from step 1.
-
-
1b. User enters invalid data and no modules are found.
-
1b1. Modulo informs User that no modules with the given information can be found.
-
1b2. Step 1 repeated until User enters a correct module code.
Use case resumes from step 2.
-
-
3a. User added a module with no events.
-
Use case resumes from step 5.
-
-
3b. User exited Modulo before adding all events.
-
3b1. Modulo saves all events that were already added.
Use case ends.
-
-
4a. User enters an invalid slot.
-
4a1. Modulo cancels the request by the User.
-
4a2. Modulo informs the User of the cancellation.
Use case ends.
-
Use case: UC03 - Delete a module / event / deadline
-
User enters
deletefollowed by an input ordelete d/followed by an input for deadlines. -
Modulo parses the input.
-
The input is parsed and the relevant item is deleted.
-
Modulo displays the item or items that have been deleted. Use case ends.
Extensions
-
1a. User enters an invalid input.
-
1b. Step 2 takes place.
-
1b1. Modulo informs the user that the item the user wants to delete does not exist.
-
1b2. User enters a new item to deleteadd
Use case resumes from step 1.
-
Use case: UC04 - Set Done to Deadline if user viewing a event
MSS Preconditions: Module, Event and deadline are added.
Guarantees: Status of viewed deadline is updated.
-
User enter index of deadline. e.g: done 1.
-
Modulo checks is if the index is valid or not and toggles the completion status of the deadline. If the deadline was incomplete, it would be completed, and vice versa. The color of the status changes accordingly and success message will displayed in result box.
Use case ends.
Extensions
-
5a. User enters invalid index. e.g: done 1000
-
5a1. Module inform user that index is not valid.
Use case resumes from step 5.
-
Use case: UC05 - Set Done to deadline if user not viewing event.
MSS Preconditions: Module, Event and deadline are added and exits in Modulo.
Guarantees: Status of deadline under correct module and event is updated.
-
User enter module code, event name and index of deadline. e.g: done 1 m/CS2103 e/Tutorial 2.
-
Modulo searches for the registered module, event and index of the deadline toggles the completion status of the deadline. If the deadline was incomplete, it would be completed, and vice versa. A success message will displayed in result box
Use case ends.
Extensions
-
1a. User enters wrong module code and no module is found.
-
1a1. Modulo informs User that the module does not exists.
-
1b2. Step 1 repeated until User enters a correct module code.
Use case resumes from step 2.
-
-
1a. User enters correct module code but wrong event name and no event is found.
-
1a1. Modulo informs User that the event does not exists.
-
1b2. Step 1 repeated until User enters a correct event name. Use case resumes from step 2.
-
Use case: UC06 - List Event
MSS Preconditions: Modules and Events are already added in Modulo .
Guarantees: A list of added Events are displayed.
-
User enter list event.
-
Modulo searches for all the events that are added in the system and displayed in the left panel.
Use case ends.
Extensions
-
1a. User enters invalid command. e.g: list tutorial
-
1a1. Module inform user the command is invalid and display correct format to user
Use case resumes from step 1.
-
Use case: UC07 - List Module
MSS Preconditions: Modules are added in Modulo .
Guarantees: A list of added Modules is displayed.
-
User enter list module
-
Modulo searches for all the modules that are added in the system and displayed in the left panel.
Use case ends.
Extensions
-
1a. User enters invalid command. e.g:
list CS2103-
1a1. Module inform user the command is invalid and display correct format to user
Use case resumes from step 1.
-
Use case: UC08 - View Module
MSS Preconditions: Modules data are added in Modulo.
Guarantees: Details of selected module will be displayed.
-
User enter view command, e.g view 1(index).
-
Modulo will searches and for the correct index from module list and display the details of module at the right panel. Use case ends.
Extensions
-
2a. User enters invalid index. e.g: view 1000
-
2a2. Module inform user that index is not valid.
-
2b2. Step 2 repeated until user enters a valid index.
-
Use case resumes from step 2.
Use case: UC09 - View Event
MSS Preconditions: Modules and events are added in Modulo .
Guarantees: Details of selected event will be displayed.
-
User enter view command, e.g view 1(index).
-
Modulo will searches and for the correct index from the events list and display the details of event at the right panel.
Use case ends.
Extensions
-
2a. User enters invalid index. e.g: view 1000
-
2a2. Module inform user that index is not valid.
-
2b2. Step 2 repeated until user enters a valid index.
-
Use case resumes from step 2.
Use case: UC10 - Export
MSS Preconditions: Application is running.
Guarantees: An .ics file is generated containing Event and Deadline from user’s calendar.
-
User enters a directory for system to export, e.g. /data.
-
Modulo looks for the directory specified by user.
-
Modulo deposits an .ics file into the specified directory.
Use case ends.
Extensions
-
2a. Modulo is unable to find the directory specified by user.
-
2a1. Modulo creates the directory.
Use case resumes from step 3.
-
Appendix D: Non-Functional Requirements
-
A NUS student with above-average typing speed for regular English text (i.e. not code, not system admin commands) should be able to accomplish most of the tasks faster using commands than using the mouse.
-
Should work on any mainstream OS as long as it has Java 11 or above installed.
-
Should be able to run seamlessly with 10 modules’ worth of data.
-
Data should be persistent within the local machine and the save file should be editable.
-
The application should not require an installer and be for a single user, with its size being smaller than 100mb.
-
Object-oriented.
{More to be added}
Appendix E: Glossary
- Mainstream OS
-
Windows, Linux, Unix, OS-X
- Module
-
Modules that the User is taking for AY19/20 Semester 2.
- Event
-
There are two types of events: official and user-added. Official ones include events such as Lectures, Tutorials, Recitations, Sectionals etc. User-added are events that are not recognised.
Refer to here for the list of recognised event types.
- Deadline
-
Individual tasks to complete that can be tagged to a specific event.
Appendix F: Product Survey
NUSMods
Author: Zhu Hanming
Pros:
-
Extremely clean and intuitive UI.
-
Effortless data population and contains all the information I may need.
-
Can save my data as a
.icsfile.
Cons:
-
Not a CLI app.
-
Doesn’t help me plan my deadlines.
Appendix G: Instructions for Manual Testing
Given below are instructions to test the app manually.
| These instructions only provide a starting point for testers to work on; testers are expected to do more exploratory testing. |
G.1. Launch and Shutdown
-
Initial launch
-
Download the jar file and copy into an empty folder
-
Double-click the jar file
Expected: Shows the GUI with no data. The window size may not be optimum.
-
-
Saving window preferences
-
Resize the window to an optimum size. Move the window to a different location. Close the window.
-
Re-launch the app by double-clicking the jar file.
Expected: The most recent window size and location is retained.
-
-
Shutting down
-
Launch the help window by typing
help. -
Quit the app by typing
exit.
Expected: Both the main window and the help window should close.
-
G.2. Adding a module
-
Adding CS2103
-
Prerequisites: CS2103 not already added. If added, delete it.
-
Test case:
module m/cs2103
Expected: CS2103 to appear in the list of modules, and app to prompt for further input. -
If prompt is for tutorial, test case:
3
Expected: Tutorial slot 3 should be added. -
If prompt is for lecture, test case:
1
Expected: Lecture slot 1 should be added.
-
G.3. Adding an event
-
Adding Exam to CS2103
-
Prerequisites: CS2103 already added. No event named Exam has been added to CS2103 yet.
-
Test case:
event n/Exam m/CS2103 s/2020-01-15 09:00 e/2020-01-15 10:00 v/Home
Expected: Event named Exam should appear in the list of events. To check, enterlist events. It should be near the top of the list. The details should be as entered.
-
-
Adding recurring events to CS2103
-
Prerequisites: CS2103 already added. No recurring event named Self Study has been added to CS2103 yet.
-
Test case:
event n/Self Study m/CS2103 s/2020-01-20 09:00 e/2020-01-20 10:00 v/Home r/YES until/2020-02-20
Expected: Events named Self Study 1, Self Study 2, until Self Study 5 should appear, with a frequency of 1 week, and stopping before 2020-02-20.
-
G.4. Adding a deadline
-
Adding a deadline to CS2103 Exam
-
Prerequisites: CS2103 added. Event named Exam added. No deadline named "Study hard for exam" has been added to the event yet.
-
Test case:
deadline n/Study hard for exam m/CS2103 e/Exam
Expected: Deadline added to Exam. To check, first make sure you’re listing events withlist events, then enterview INDEX, whereINDEXis the index of the event on the list.
-
G.5. Completing a deadline
-
Complete Study hard for exam.
-
Prerequisites: CS2103 added. Event named Exam added. Deadline named Study hard for exam added, and is not completed.
-
Test case:
done 2 m/CS2103 e/Exam
Expected: Deadline named Study hard for exam is completed.
-
G.6. Switching lists
-
List events
-
Test case:
list events
Expected: If not already listing events, events will now be listed.
-
-
List modules
-
Test case:
list modules
Expected: If not already listing modules, modules will not be listed.
-
G.7. View event or module
-
View module
-
Prerequisite: List all modules using the
list modulescommand. At least one module. -
Test case:
view 1
Expected: Details of the first module should show on the right panel.
-
-
View event
-
Prerequisite: List all events using the
list eventscommand. At least one event. -
Test case:
view 1
Expected: Details of the first event should show on the right panel.
-
G.8. Find event or module
-
Find event(s) with Self Study in their names
-
Prerequisite: List all events using the
list eventscommand. Has event(s) named Self Study. -
Test case:
find self study
Expected: All events with Self Study in their names would appear. You can operate on this filtered list.
-
-
Find Software Engineering
-
Prerequisite: List all modules using the
list modulescommand. CS2103 added. -
Test case:
find software engineering
Expected: CS2103 should show, along with any other modules that may have Software Engineering in their names.
-
G.9. Deleting a module
-
Deleting a module using index while all modules are listed
-
Prerequisites: List all modules using the
list modulescommand. Multiple modules in the list. -
Test case:
delete 1
Expected: First module is deleted from the list. All events of that module are deleted. Details of the deleted module shown in the status message. -
Test case:
delete 0
Expected: No module is deleted. No events deleted. Error details shown in the status message. -
Other incorrect delete commands to try:
delete,delete x(where x is larger than the list size).
Expected: Similar to previous.
-
-
Deleting a module using search terms while all modules are listed
-
Prerequisites: List all modules using the
list modulescommand. CS2103 in the list. Other CS modules in the list. -
Test case:
delete CS2103
Expected: CS2103 is deleted from the list. Details of the deleted module shown in the status message. -
Test case:
delete cs
Expected: All CS modules are deleted. Number of deleted modules shown in the status message. -
Test case:
delete cs2999
Expected: No module is deleted. Information shown in the status message. -
Other incorrect delete commands to try:
delete x(where x is a term that does not exist in the list).
Expected: Similar to previous.
-
G.10. Deleting an event
-
Deleting an event using index while all events are listed
-
Prerequisites: List all events using the
list eventscommand. Multiple events in the list. -
Test case:
delete 1
Expected: First event is deleted from the list. Details of the deleted event shown in the status message. -
Test case:
delete 0
Expected: No event is deleted. Error details shown in the status message. -
Other incorrect delete commands to try:
delete,delete x(where x is larger than the list size).
Expected: Similar to previous.
-
-
Deleting an event using search terms while all events are listed
-
Prerequisites: List all events using the
list eventscommand. At least one Tutorial 1 in the list. Other Tutorials in the list as well. -
Test case:
delete Tutorial 1
Expected: All events with Tutorial 1 in their names are deleted from the list. Number of deleted events shown in the status message. -
Test case:
delete Tutorial
Expected: All Tutorials are deleted. Number of deleted events shown in the status message. -
Test case:
delete Tvtor!al
Expected: No event is deleted. Information shown in the status message. -
Other incorrect delete commands to try:
delete x(where x is a term that does not exist in the list).
Expected: Similar to previous.
-
G.11. Deleting a deadline
-
Deleting a deadline using index while an event is focused
-
Prerequisites: List all events using the
list eventscommand. Events in the list. View first event withview 1. First event has a deadline. -
Test case:
delete d/1
Expected: First deadline is deleted from the list. Details of the deleted deadline shown in the status message. -
Test case:
delete 0
Expected: No deadline is deleted. Error details shown in the status message. -
Other incorrect delete commands to try:
delete,delete x(where x is larger than the list size).
Expected: Similar to previous.
-
G.12. Exporting data as .ics file
-
Export data
-
Test case:
export
Expected: Amodulo.icsfile should be created in the same./data/folder. You can use this.icsfile to add your events and deadlines into your calendar.
-
G.13. Viewing help
-
View help
-
Test case:
help
Expected: Help window appears.
-
G.14. Clearing Modulo
-
Clear all existing data in Modulo
-
Prerequisites: Some data has been added to Modulo.
-
Test case:
clear
Expected: All data cleared.
-
G.15. Saving data
-
Dealing with missing/corrupted data files
-
Corrupt the current save file under
./data/. The easiest way is to type-somewhere in one of the saved modules' academic year. Another way may be to add random characters that make the JSON format unreadable. -
Double-click the jar file
Expected: Shows the GUI with no data. -
Delete the current save file under
./data/. -
Double-click the jar file
Expected: Shows the GUI with no data.
-
Appendix H: Effort
H.1. Model
The Model of Modulo is certainly more complex than that of AddressBook.
In AddressBook, there was only one key object in play - Person.
Most of the other classes were ones that served as attributes for the Person object.
For Modulo, three different objects are managed at once, with the Model class having to juggle two different lists
at all times.
As such, there was much greater complexity, especially when the commands used one type of object as a reference for
another!
An example would be finding an event that belongs to a certain module.
The logic behind can be implemented in various ways, and we sought to reduce the complexity of this logic.
The process was rough - we didn’t get it right from the start (and we cannot say for sure that we have gotten it right currently), and we had to refactor our code over quite a few times, as we realise the limitations of our previous implementations. This is with careful planning right from the start!
H.2. Logic
Modulo implemented its own StatefulLogic that allows users to perform multistep commands.
This in itself is quite a huge step up from the existing Logic flow in AddressBook, where commands were all
"one-shot".
And as mentioned earlier, with the increased complexity of the Model and its classes, naturally, the complexity of
Logic follows. Commands are no longer "single-dimensional", and now need to perform various operations before being
able to determine the correct action to execute.
Our team spent quite a lot of effort to come up with ways to implement both the StatefulLogic and the commands.
H.3. Storage
The complexity of Storage naturally increased as well, as now we have to store objects of three types into a single
JSON file, and still have a way to recover and restore the associations between all of these "save data" upon
loading. The process of deriving our current way of doing things took quite a while as well.
H.4. Ui
Lastly, the Ui. Our Modulo team spent quite a bit of effort in ensuring that our interface was pleasing to the eye. And we’re glad that we did, as the Ui turned out the way we wanted! This is not a painless process, however. We did spend quite a bit of time undoing what we’ve designed at times, as we designed and built iteratively.
H.5. Overall
As a whole, this process was not an easy one for the Modulo team. We started off with a grandiose idea in mind, and met obstacle after obstacle. We did fight hard, but for a large part, we were slowly worn down. It’s rather sad to see that we did not achieve the goal we initially set out to due to these challenges. But we’re also very glad to say that, in exchange, we’ve learnt a lot more than we expected to. In overcoming a lot of the problems mentioned above, our team spent sessions discussing, debating and brainstorming, and we learnt together in the end.
We wouldn’t say we’re the team that spent the most effort, but we can say for sure that we didn’t spare any effort throughout the process.